
Streamline your approval process with powerful automation tools
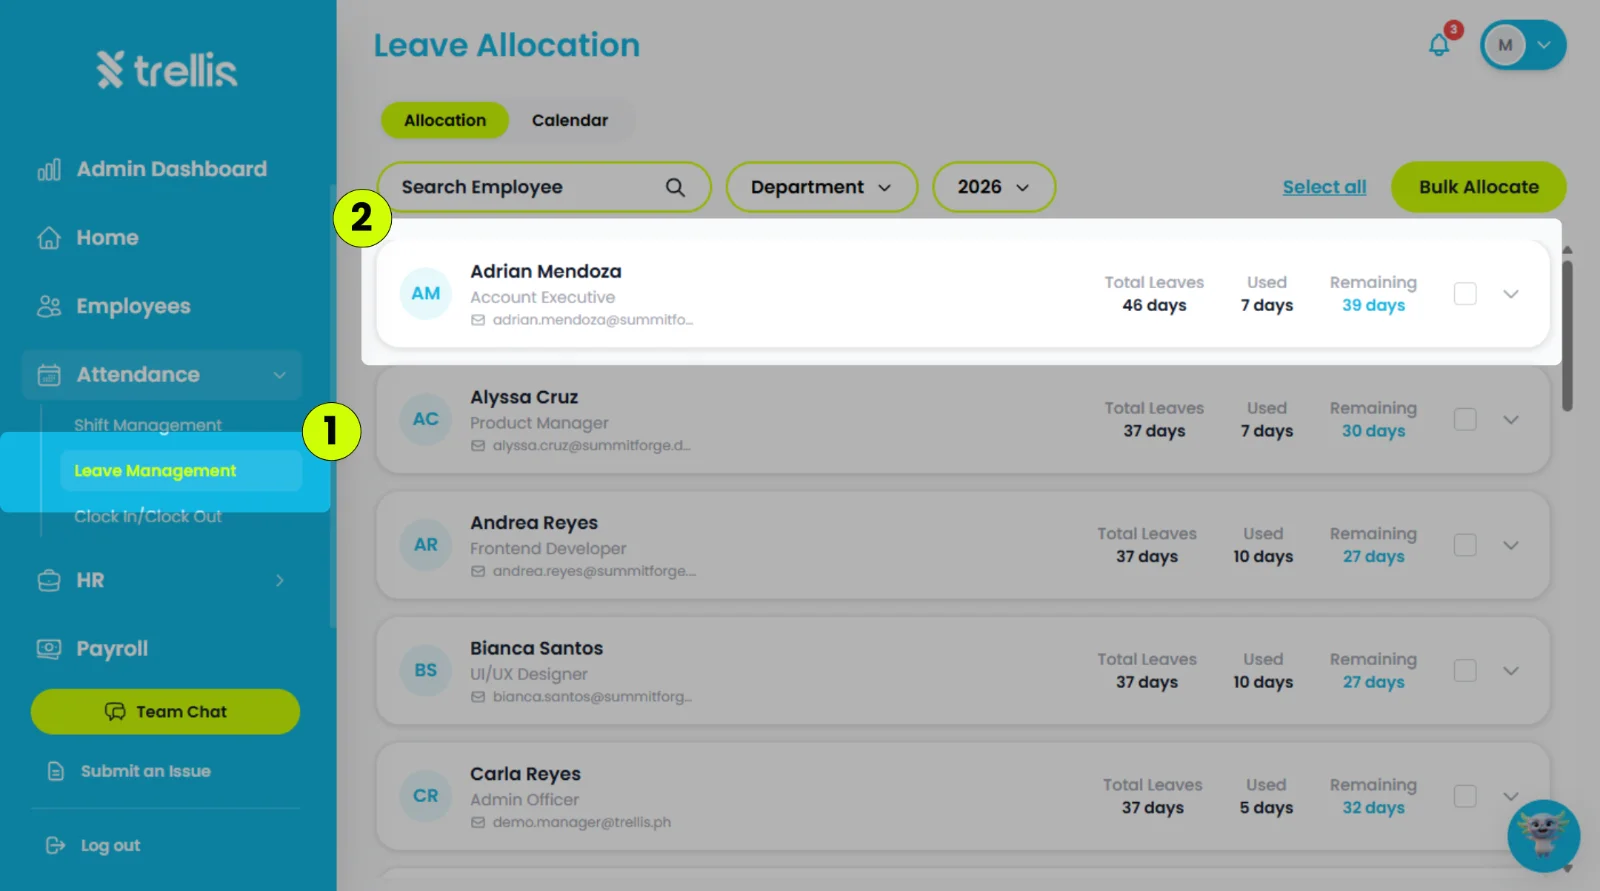
From the sidebar, click "Attendance", then select "Leave Management."
Click the employee you want to allocate leave to.
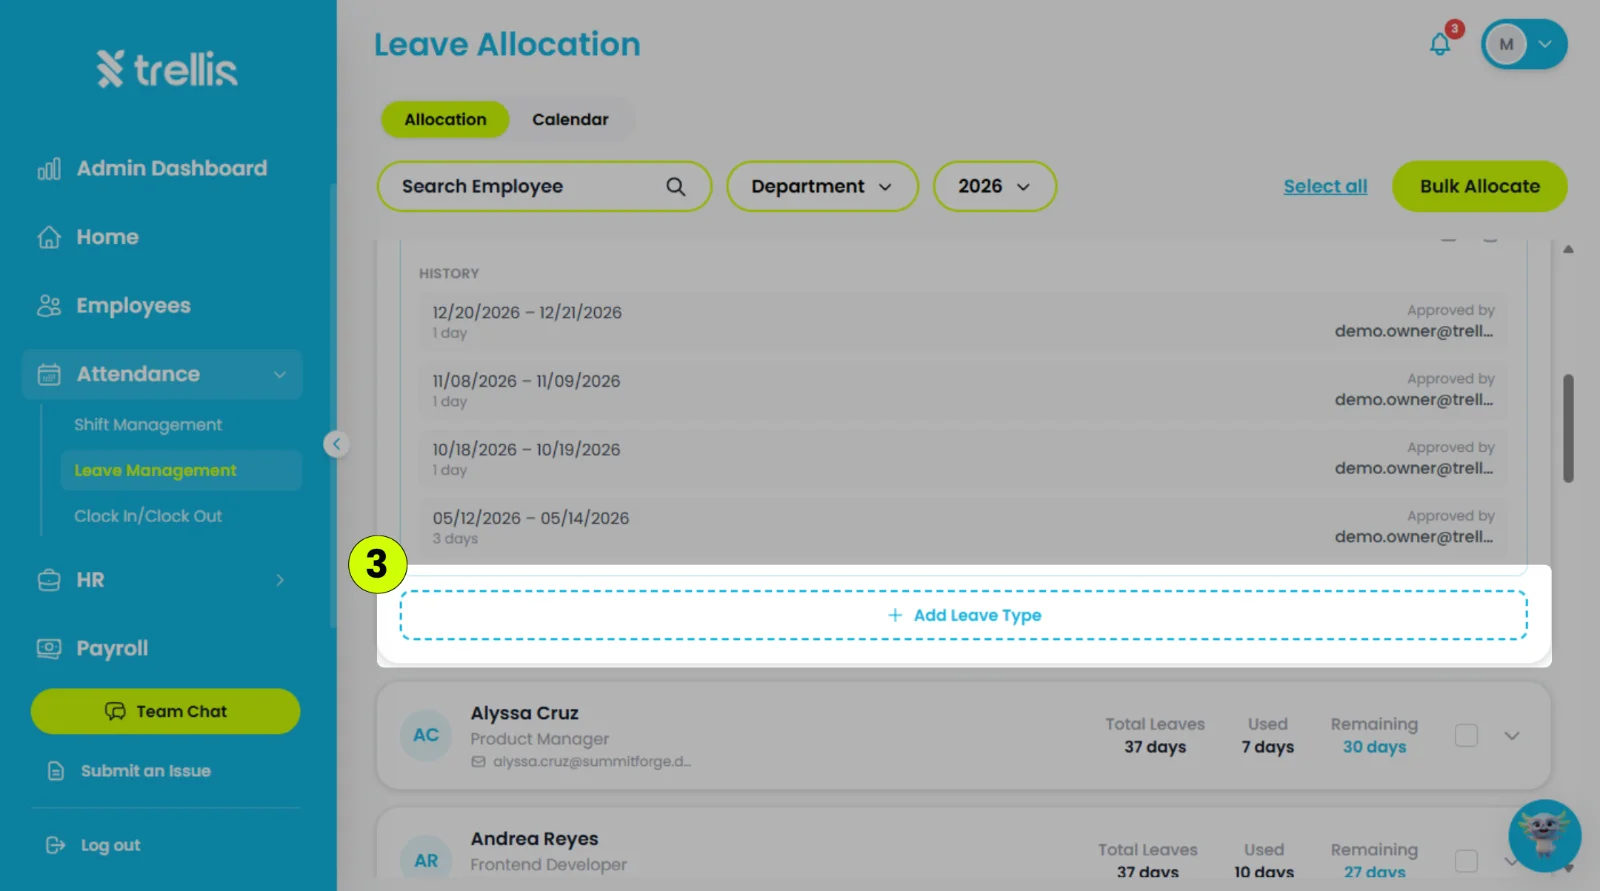
Scroll down to the employee you want to update, then click "Add Leave Type."
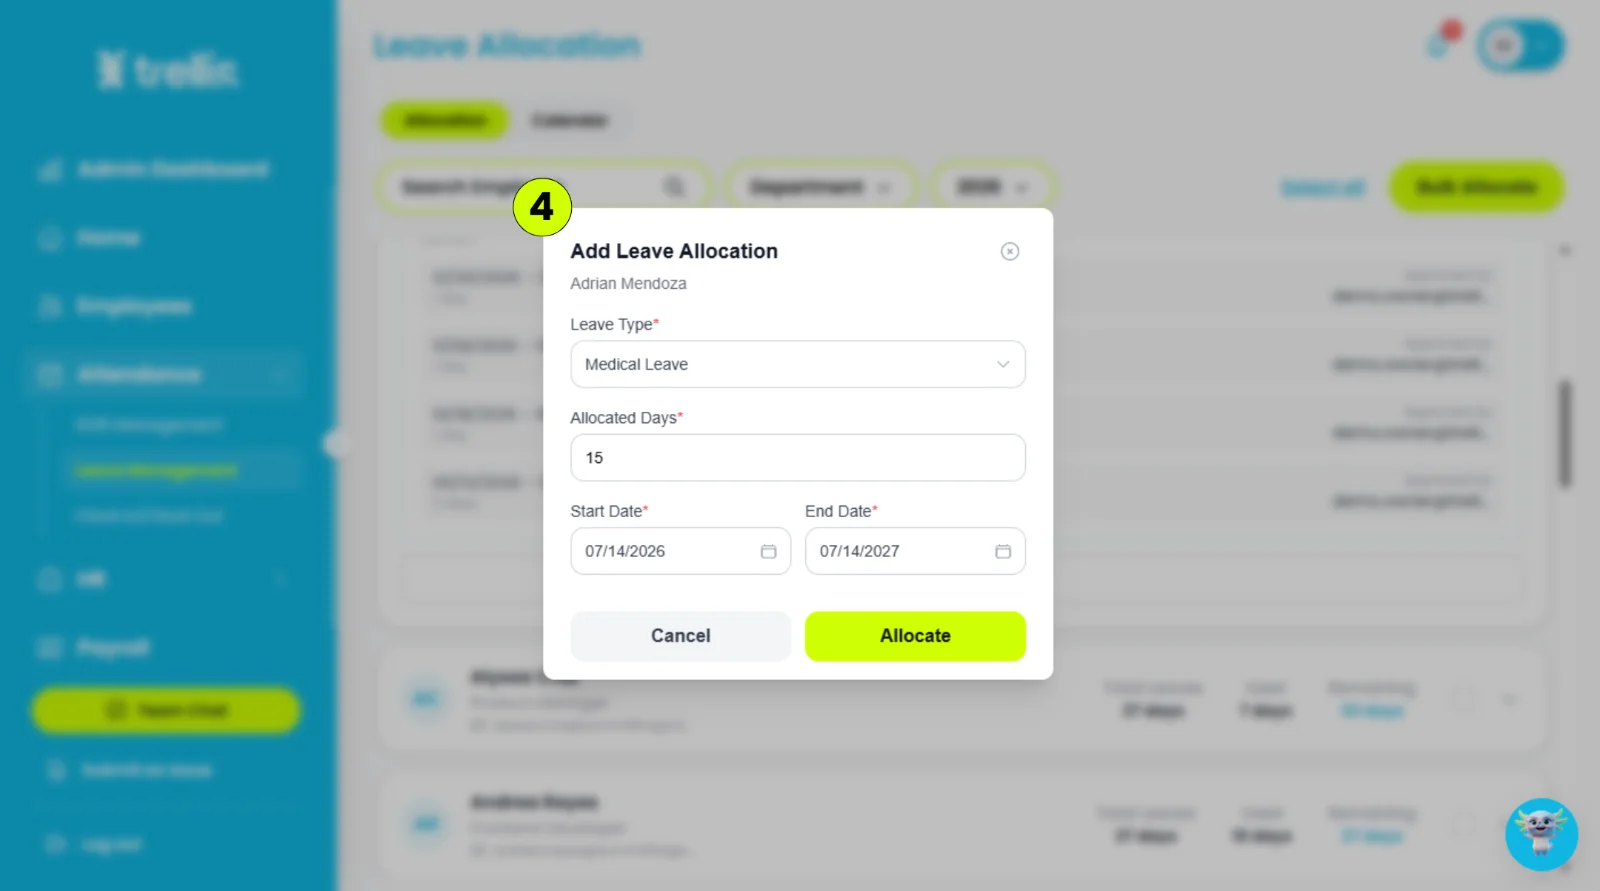
Fill in the required information, then click "Allocate".
Leave Type – The category of leave being allocated (e.g., Vacation Leave, Sick Leave).
Allocated Days – The total number of leave days assigned to the employee.
Start Date – The date when the leave allocation becomes effective.
End Date – The date when the leave allocation expires.
To change the days of a leave type the employee already has:
Open the employee as in steps 1 and 2.
On that leave type's row, click the pencil icon ("Edit allocation").
Set "Allocated Days" to the new total, then click "Save".
The total can't be lower than the days the employee has already used. The number of days used is shown under "Allocated Days".
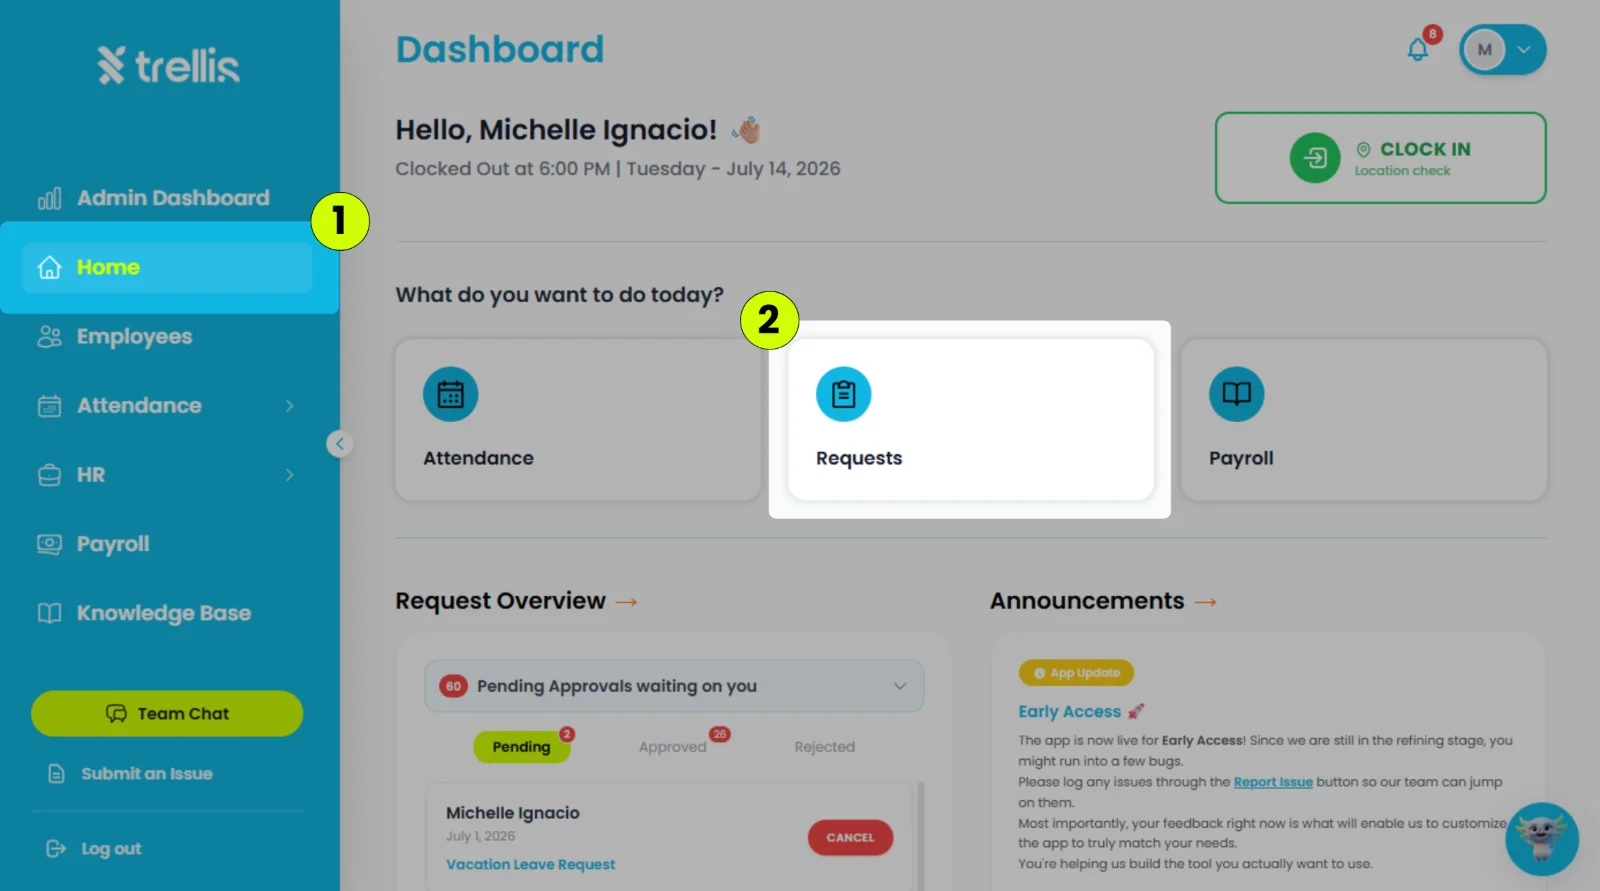
Read the full guide →From the sidebar, click "Home."
On the Dashboard, click "Requests."
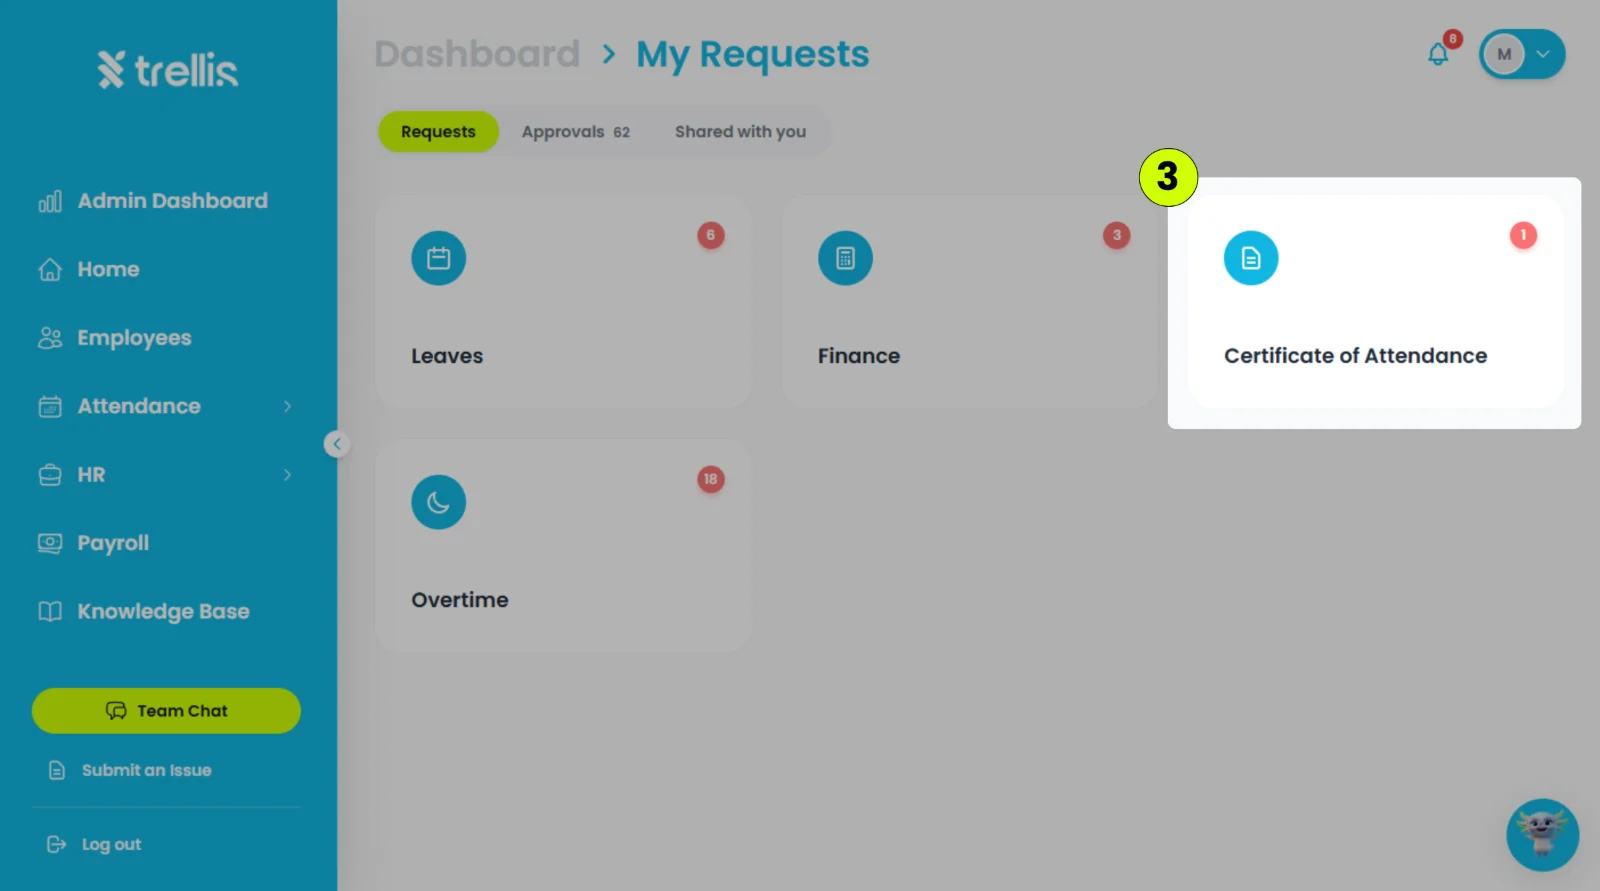
On the Requests page, click "Certificate of Attendance."
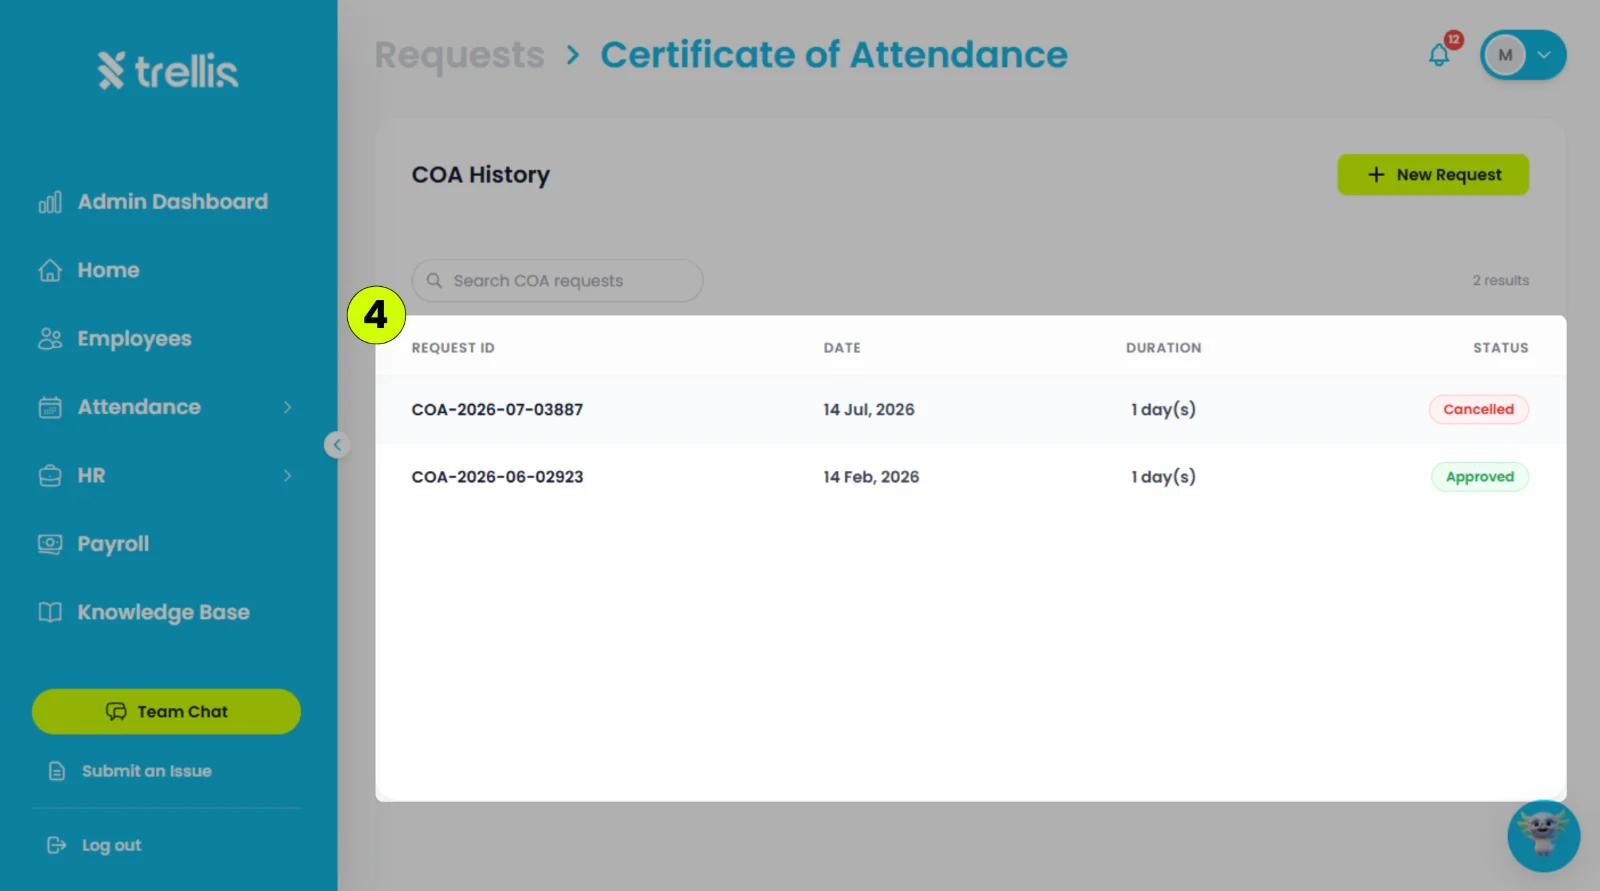
Select the COA request you want to view.
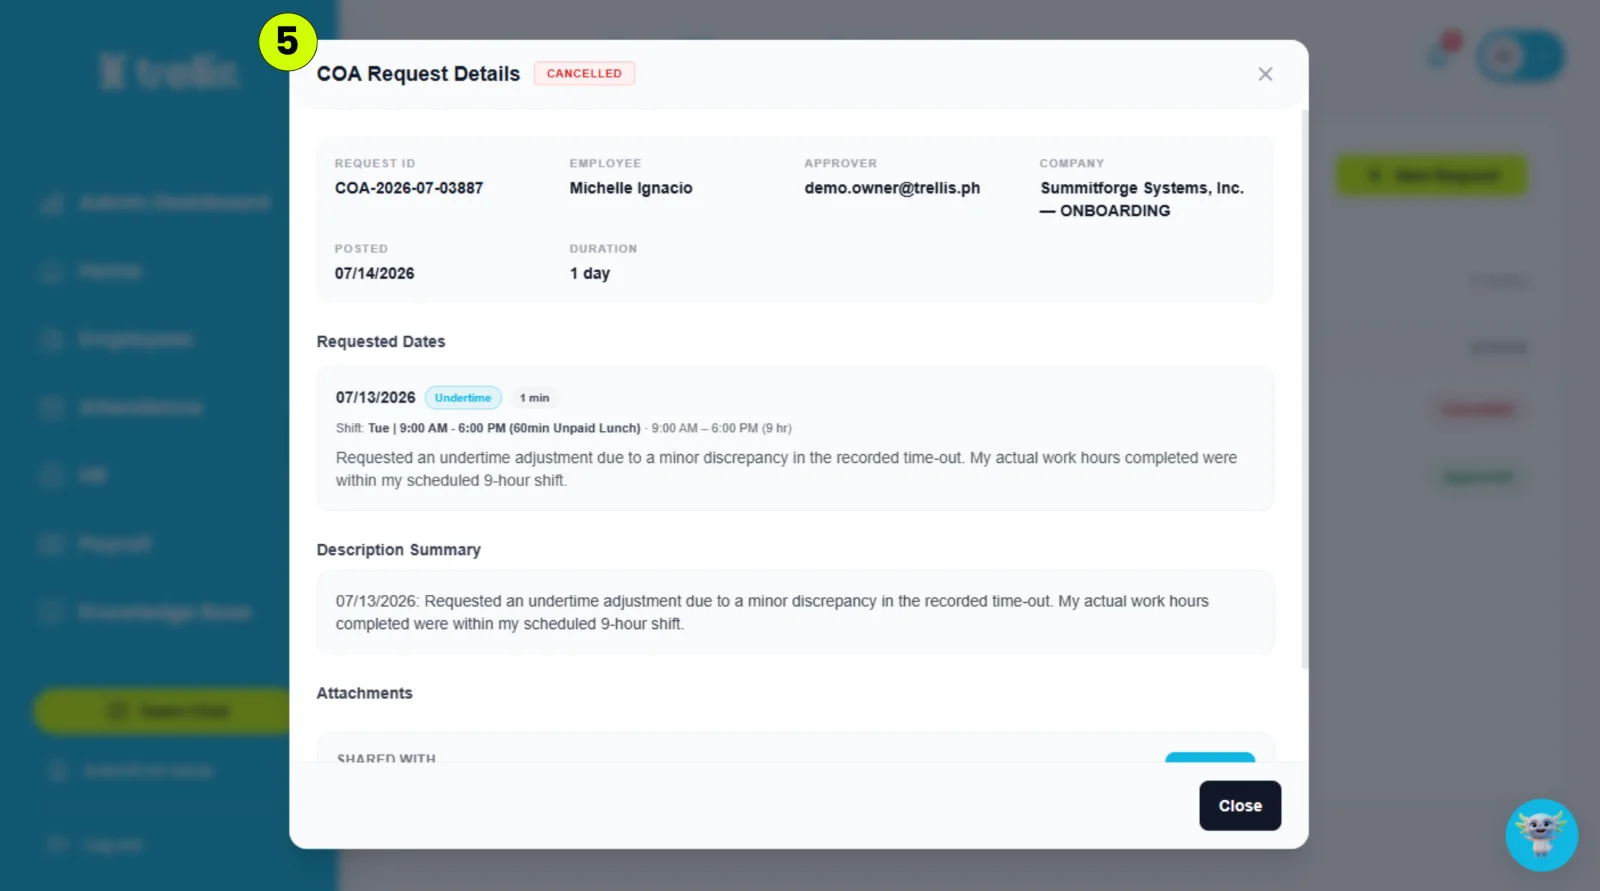
The COA Request Details window will appear, displaying the request details, requested date, status, reason, and any attached files.
 Read the full guide →
From the sidebar, click "Home."
On the Dashboard, click "Requests."
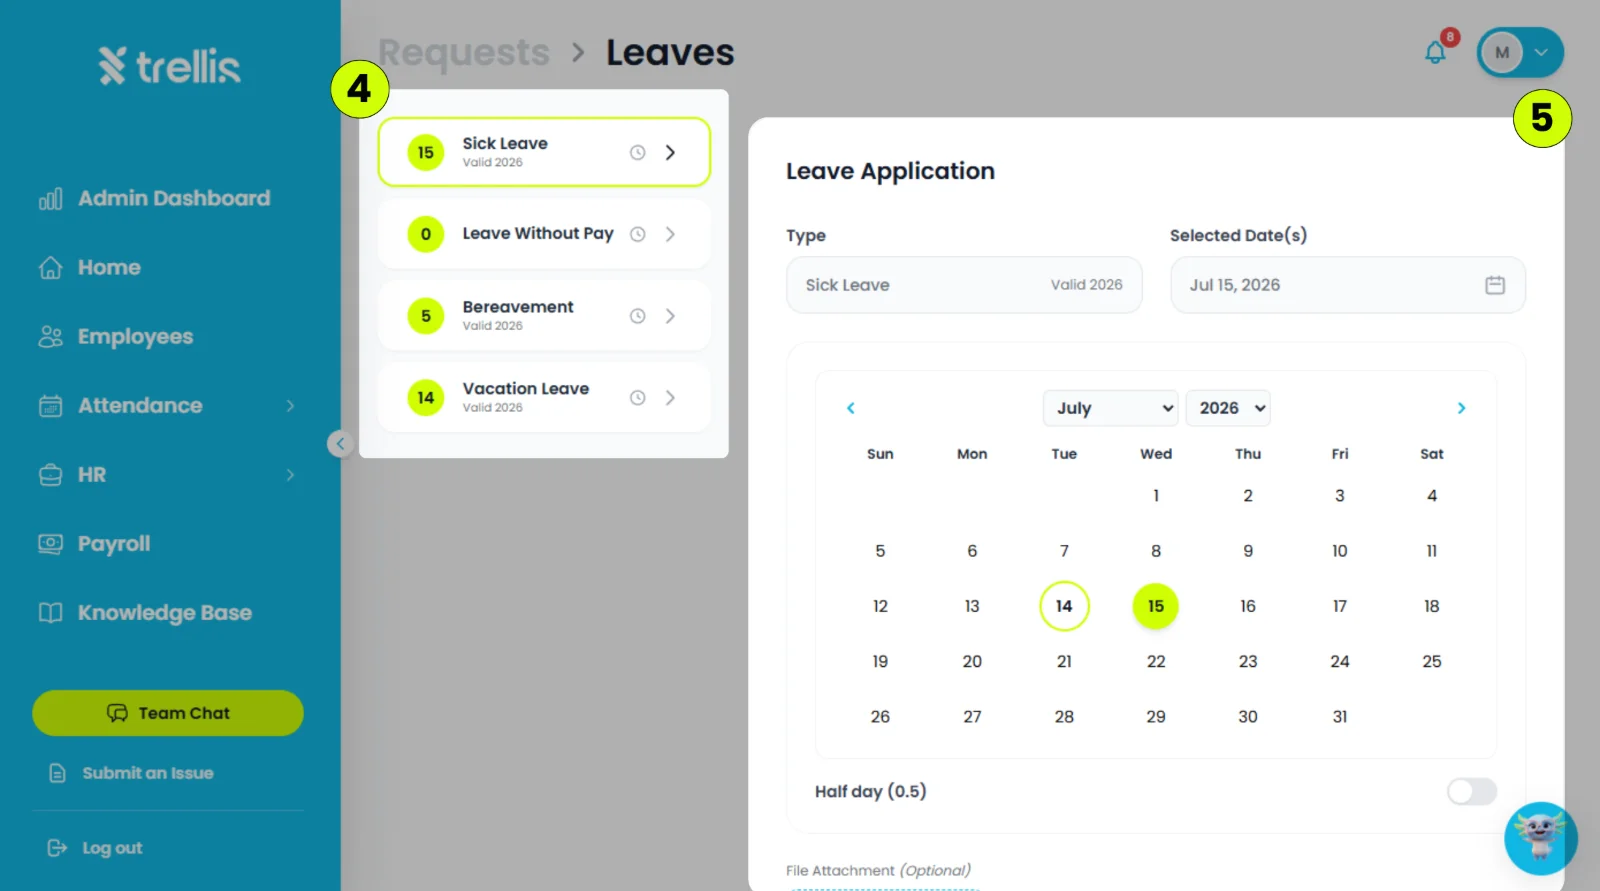
On the Requests page, click "Leaves."
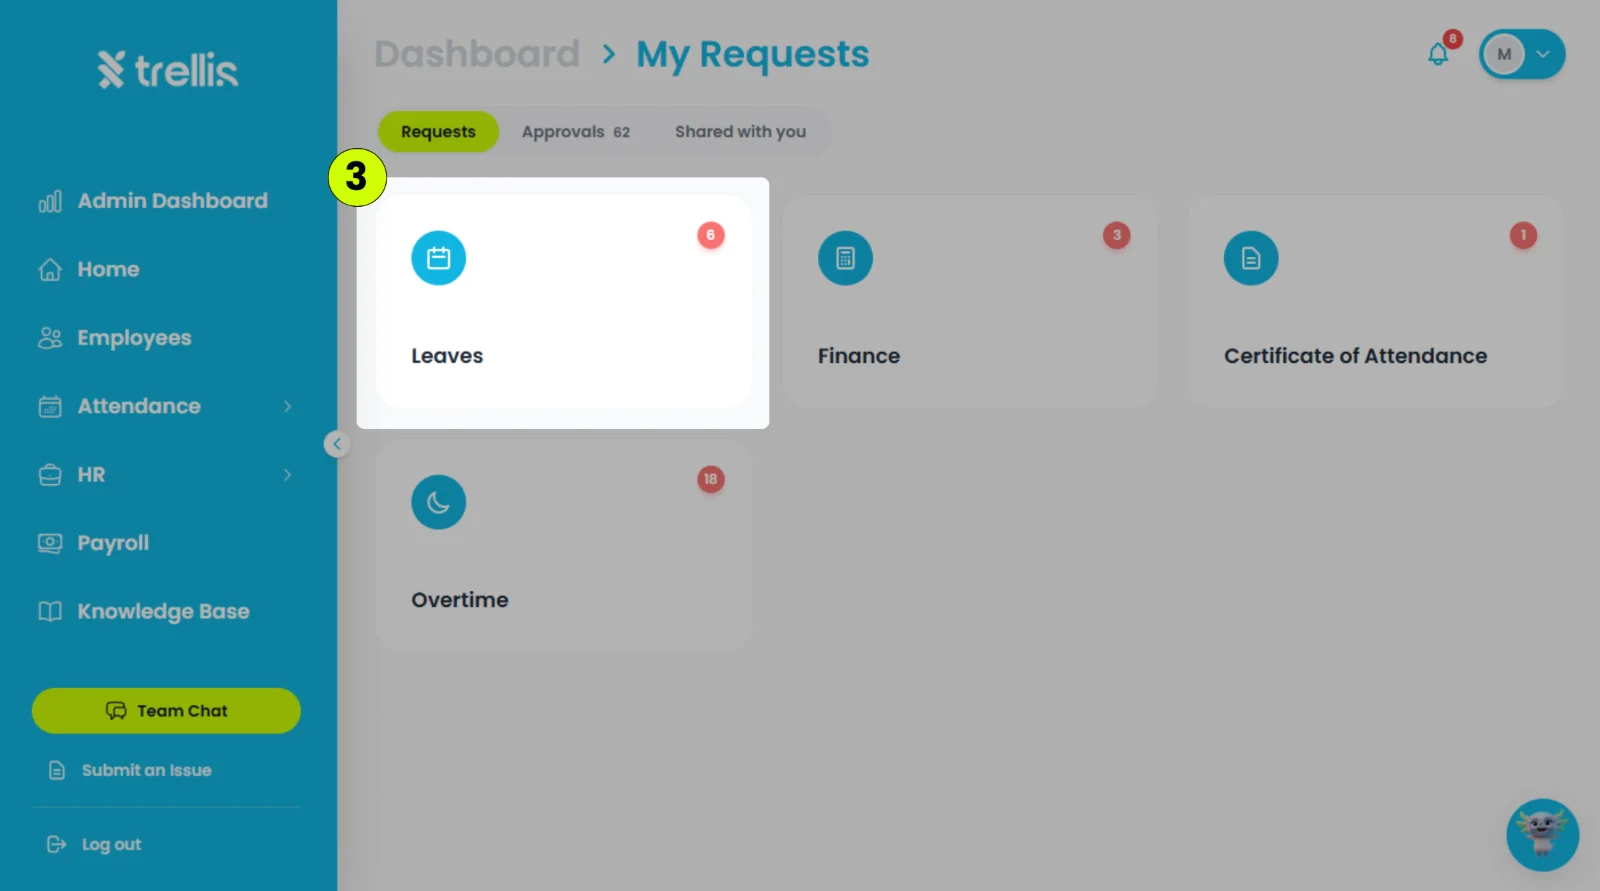
Select the leave type you want to apply for.
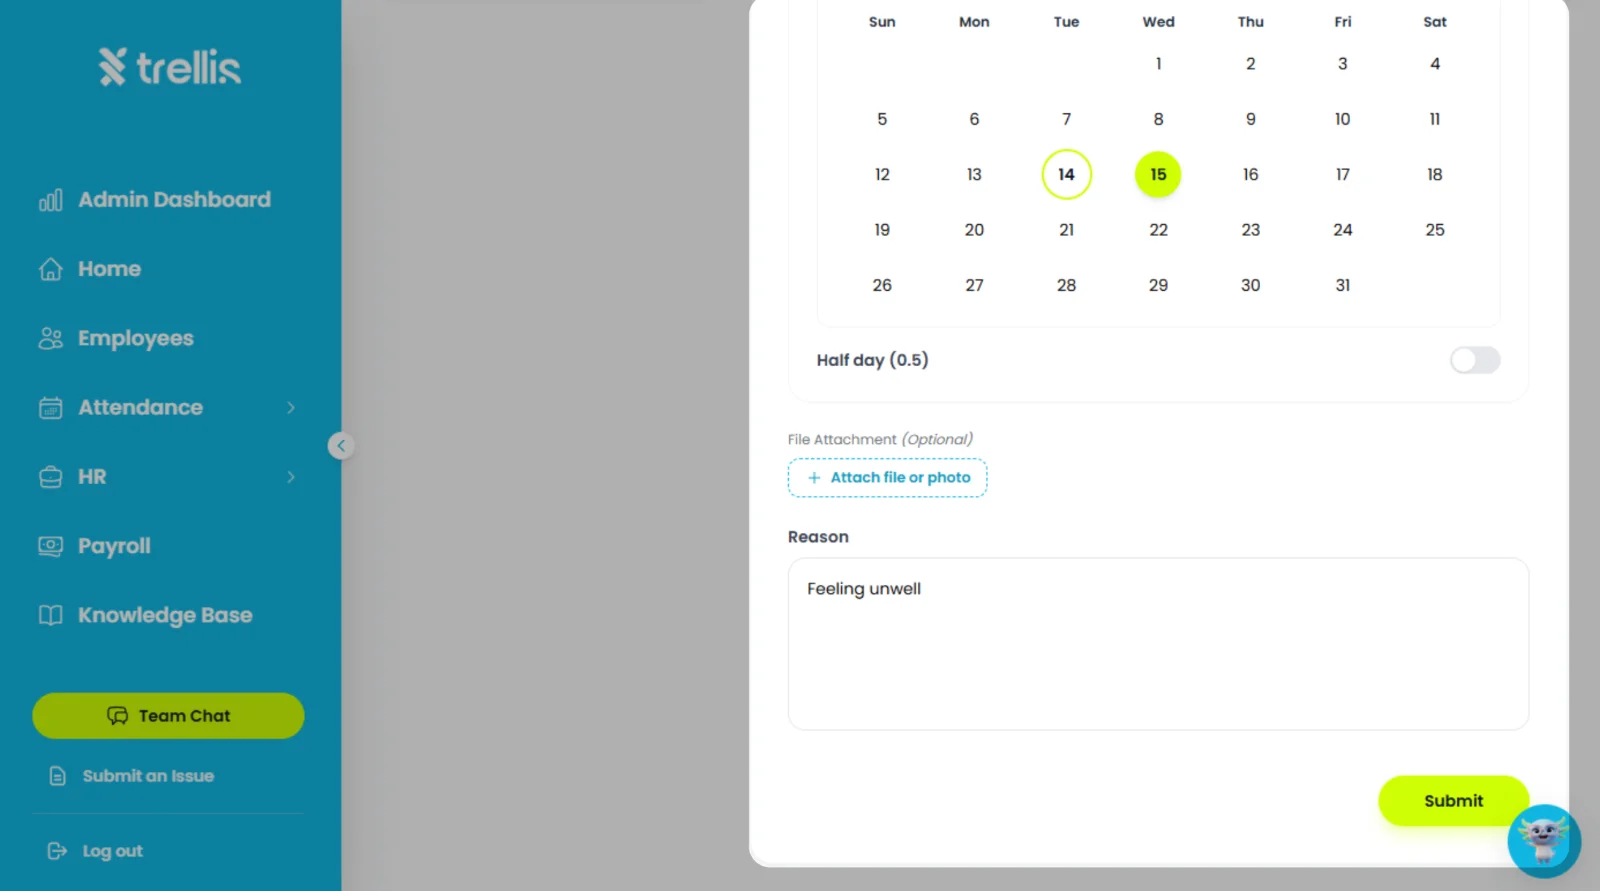
Fill in the following information, then click "Submit."
Selected Date(s) – The date or date range for your leave.
Half Day – Enable this option if you are applying for a half-day leave.
File Attachment (Optional) – Upload any supporting document, if needed.
Reason – Enter the reason for your leave application.
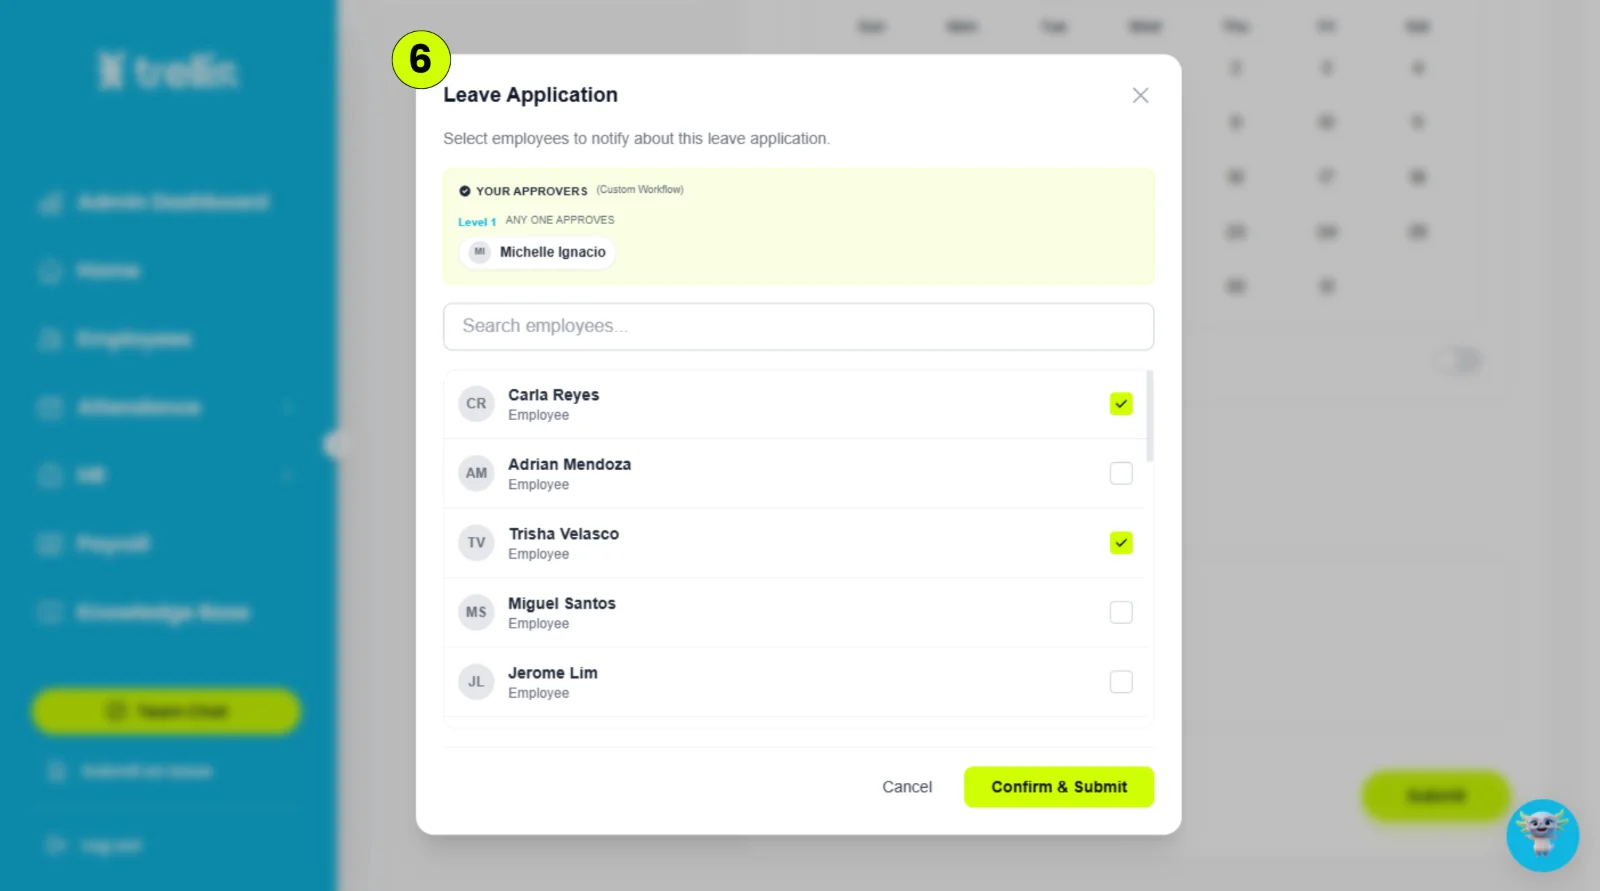
Select the employees you want to notify, then click "Confirm & Submit."
 Read the full guide →
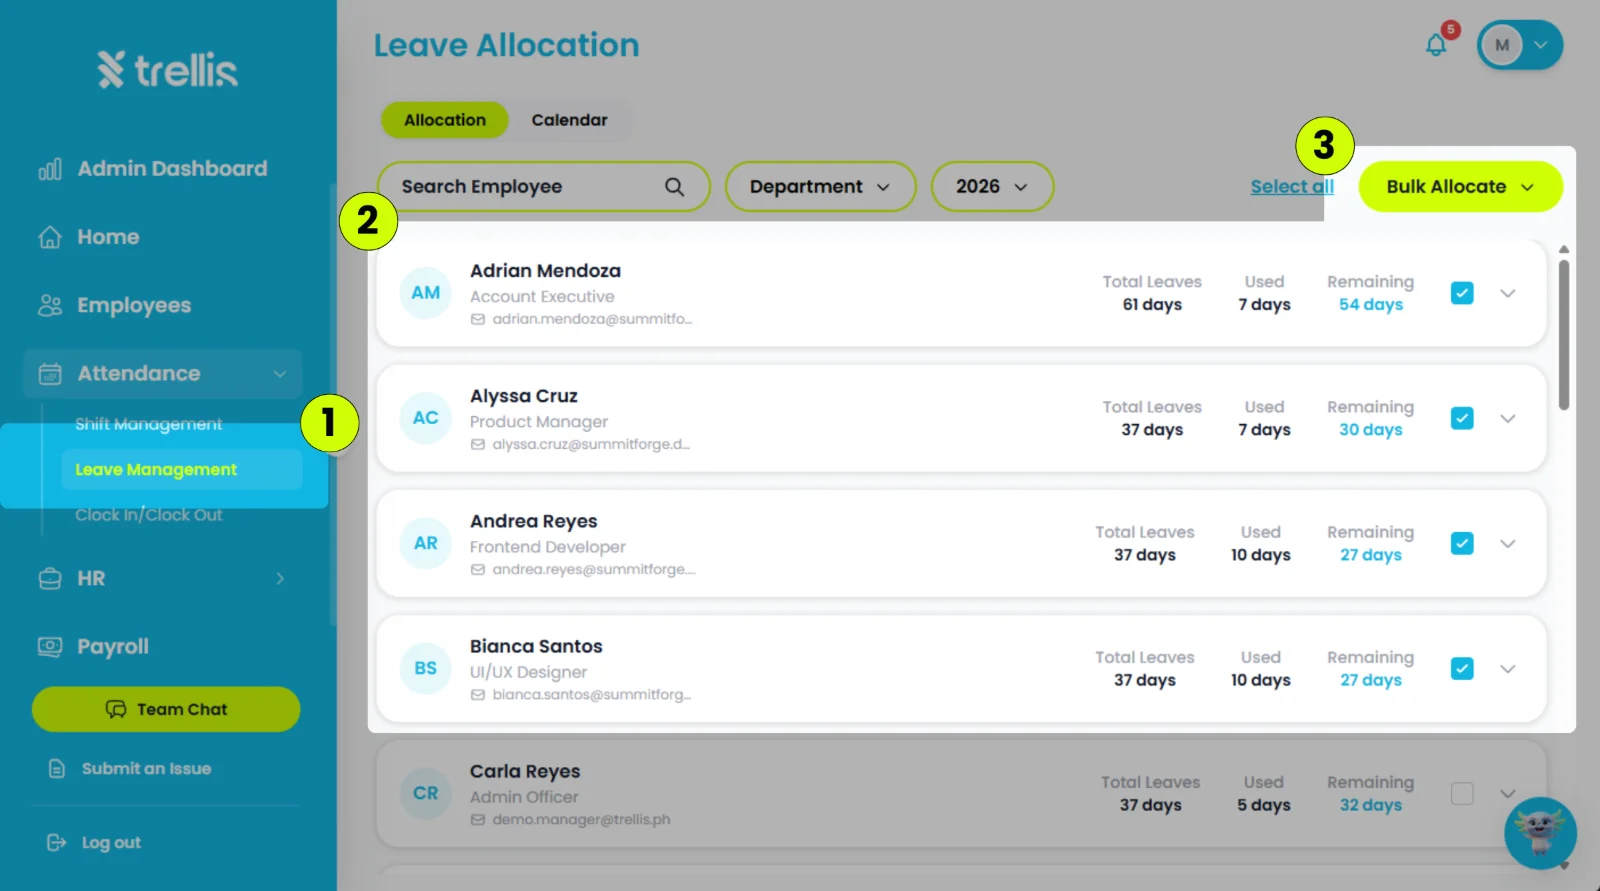
From the sidebar, click "Attendance", then select "Leave Management."
Select the checkboxes beside the employees you want to include in the bulk allocation.
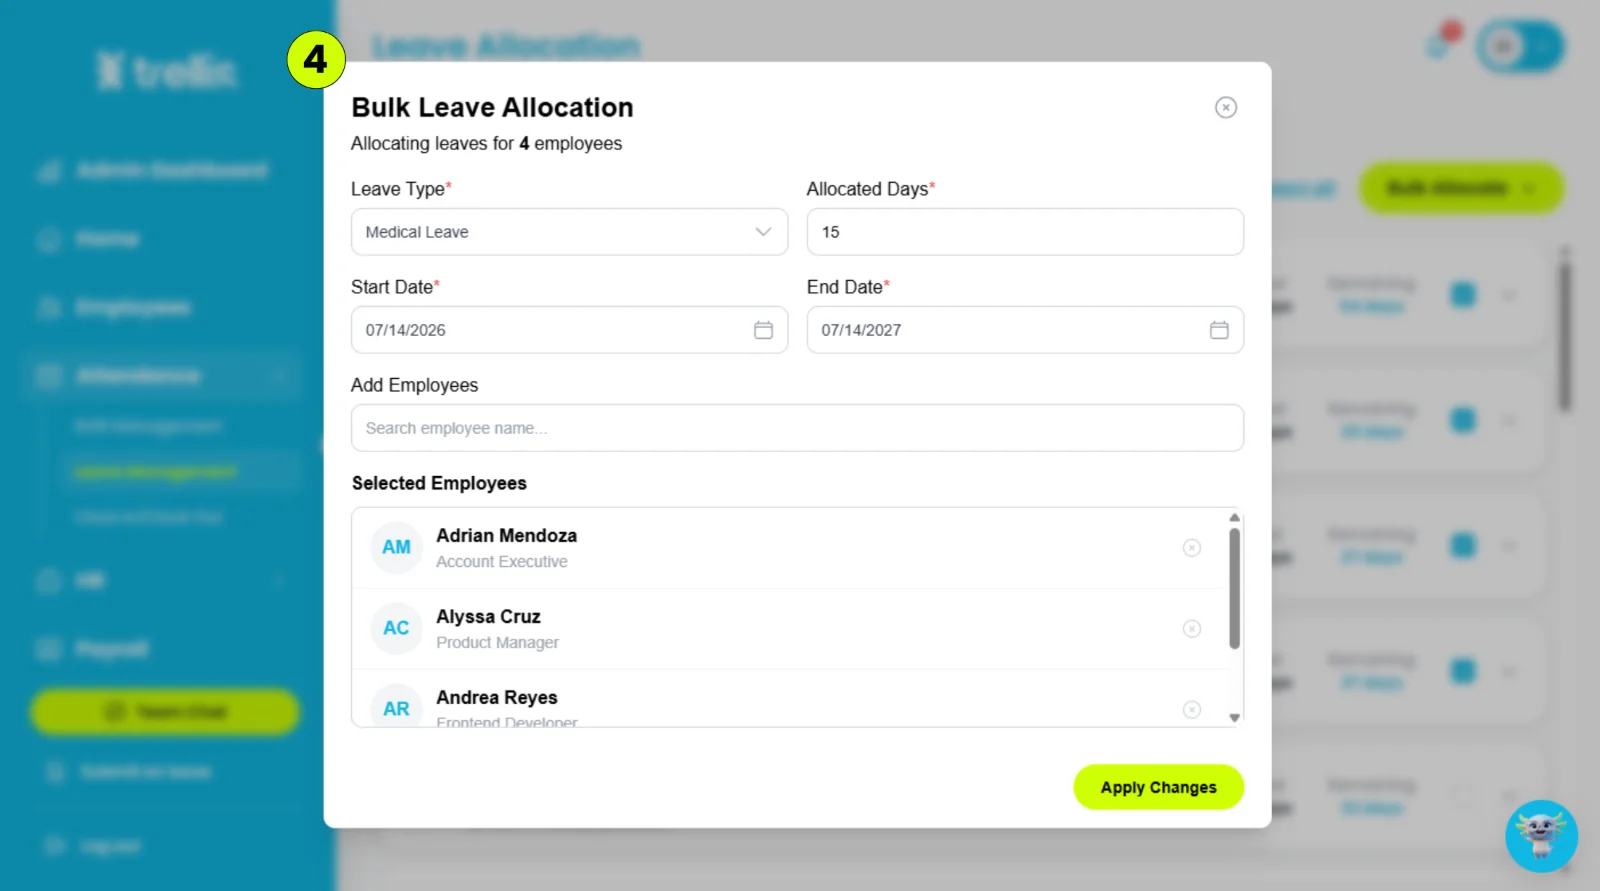
Click "Bulk Allocate."
Fill in the following information, then click "Apply Changes."
Leave Type – The type of leave to allocate.
Allocated Days – The number of leave days to allocate.
Start Date – The date when the leave allocation becomes effective.
End Date – The date when the leave allocation expires.
Add Employees – Search for and add more employees to the allocation, if needed.
 Read the full guide →
From the sidebar, click "Home."
On the Dashboard, click "Requests."
On the Requests page, click "Certificate of Attendance."
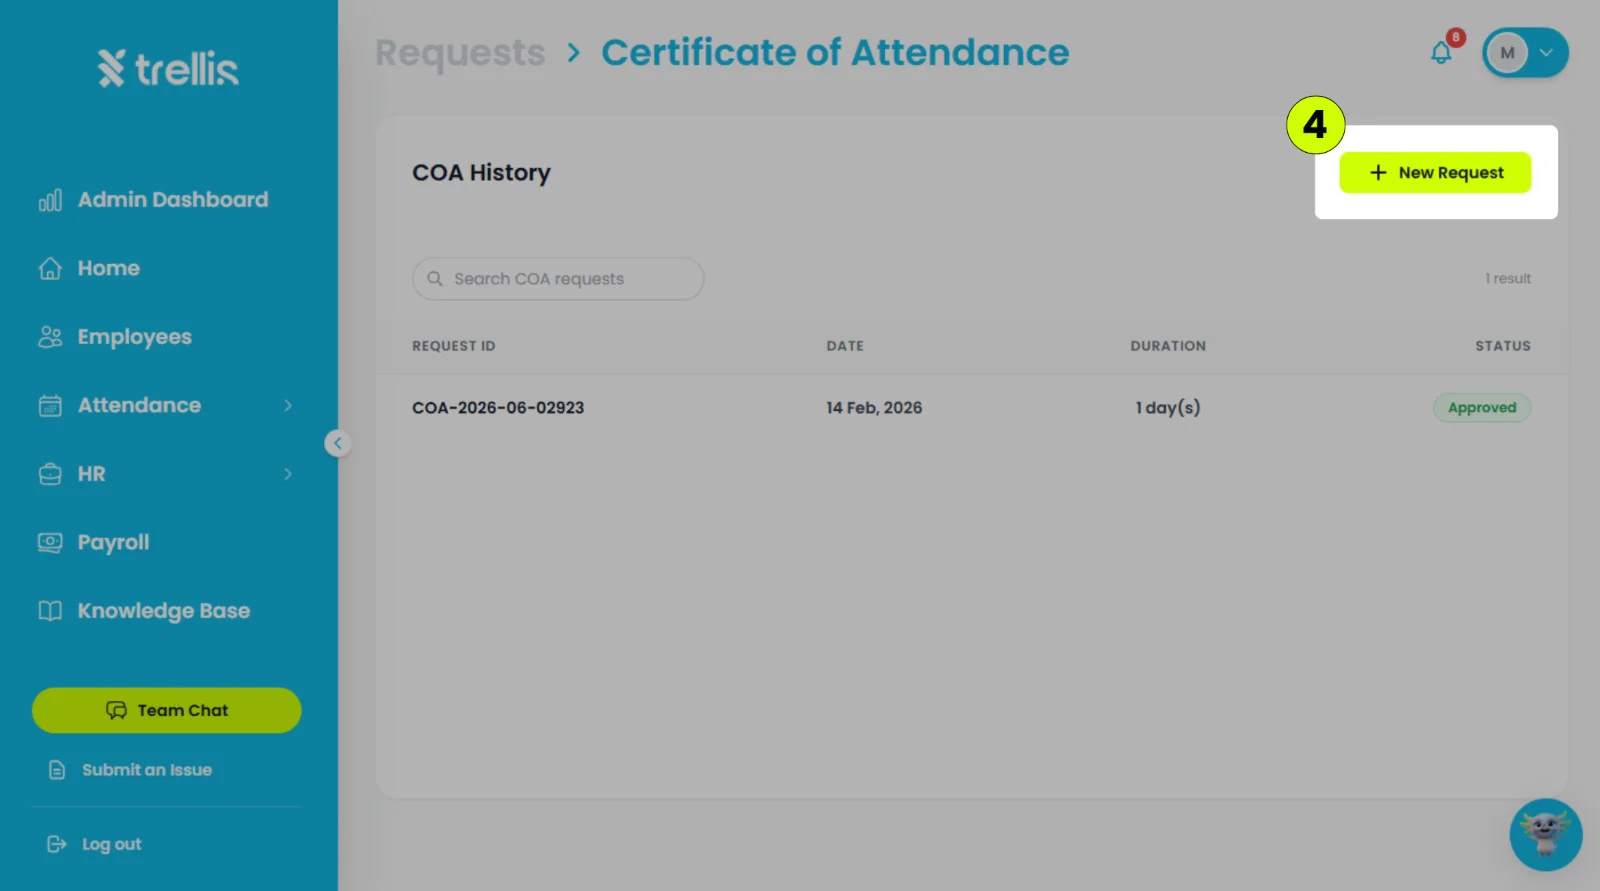
Click "New Request."
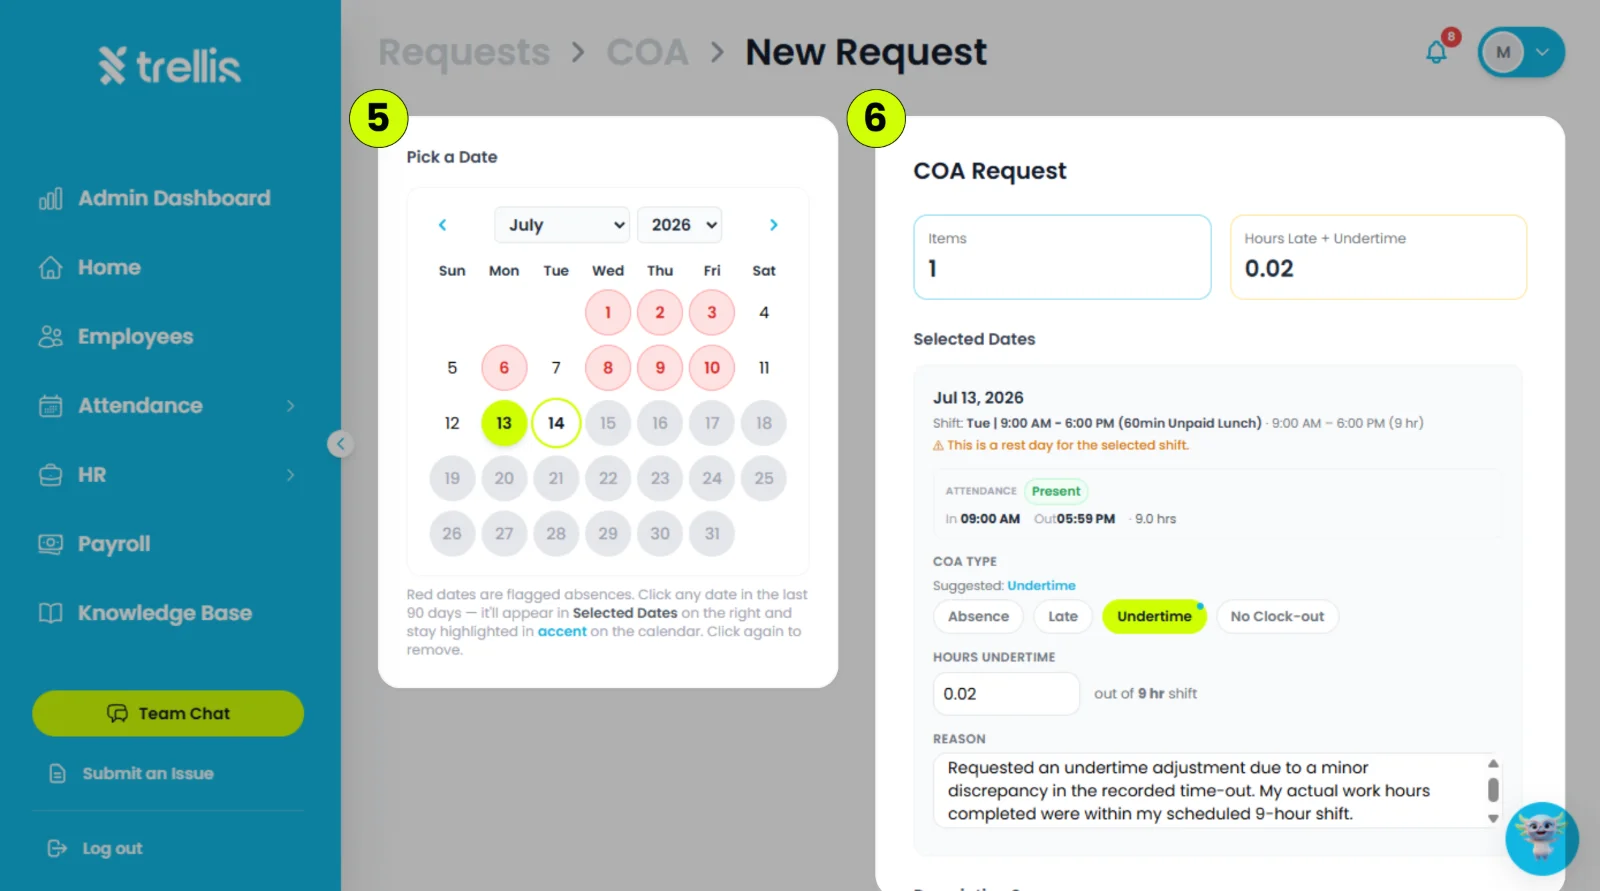
Select the date you want to file a COA request.
Fill in the following information, then click "Submit."
COA Type – The type of certificate you are requesting.
Reason – The reason for requesting the certificate.
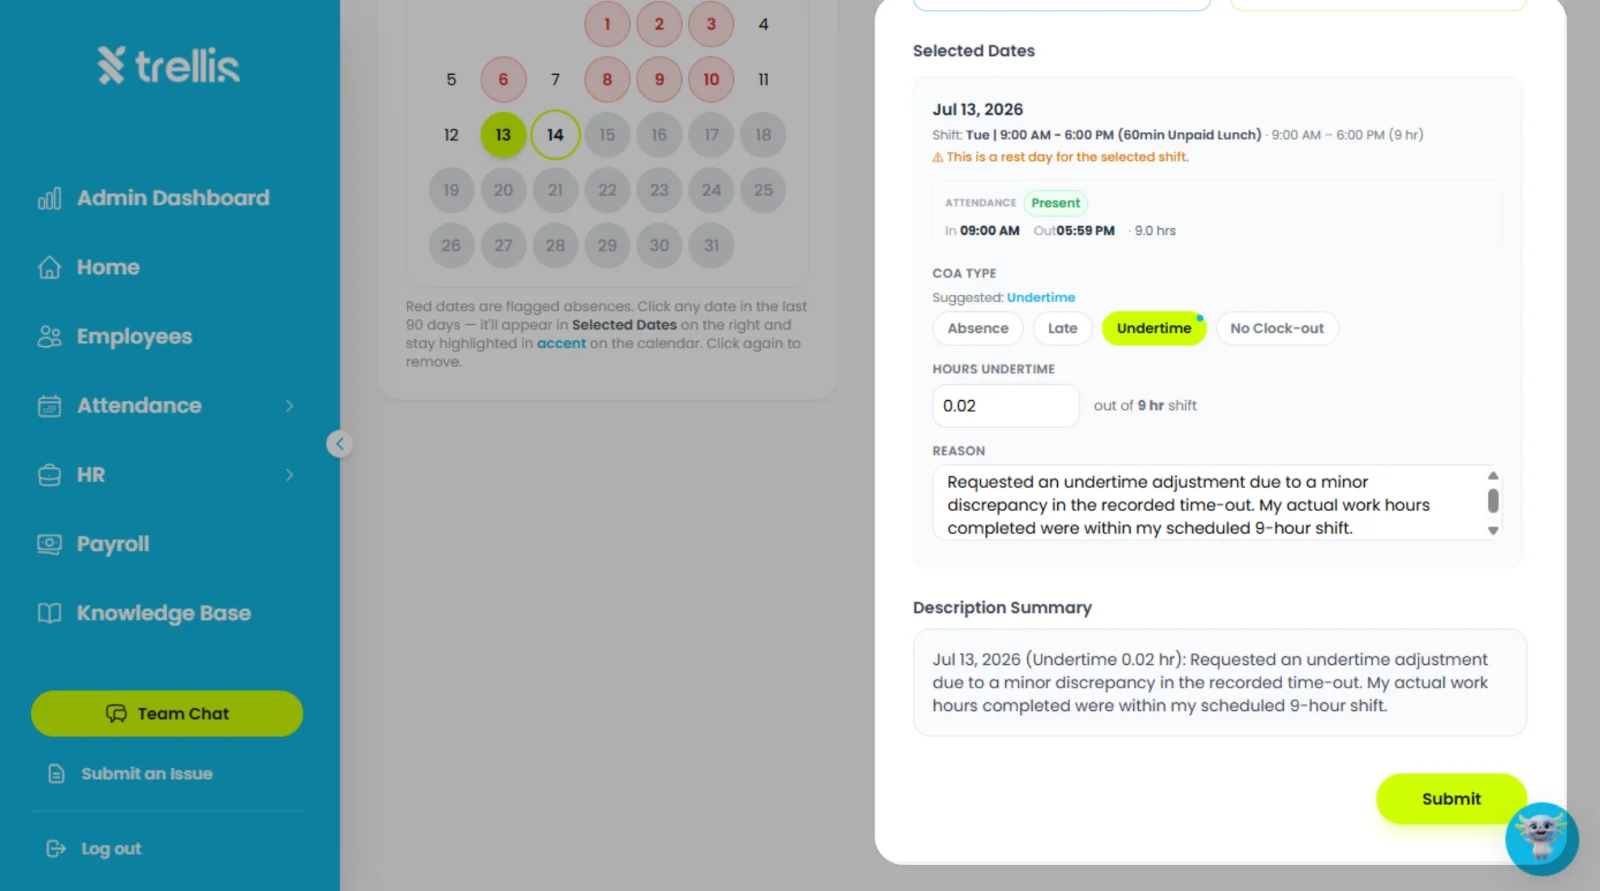
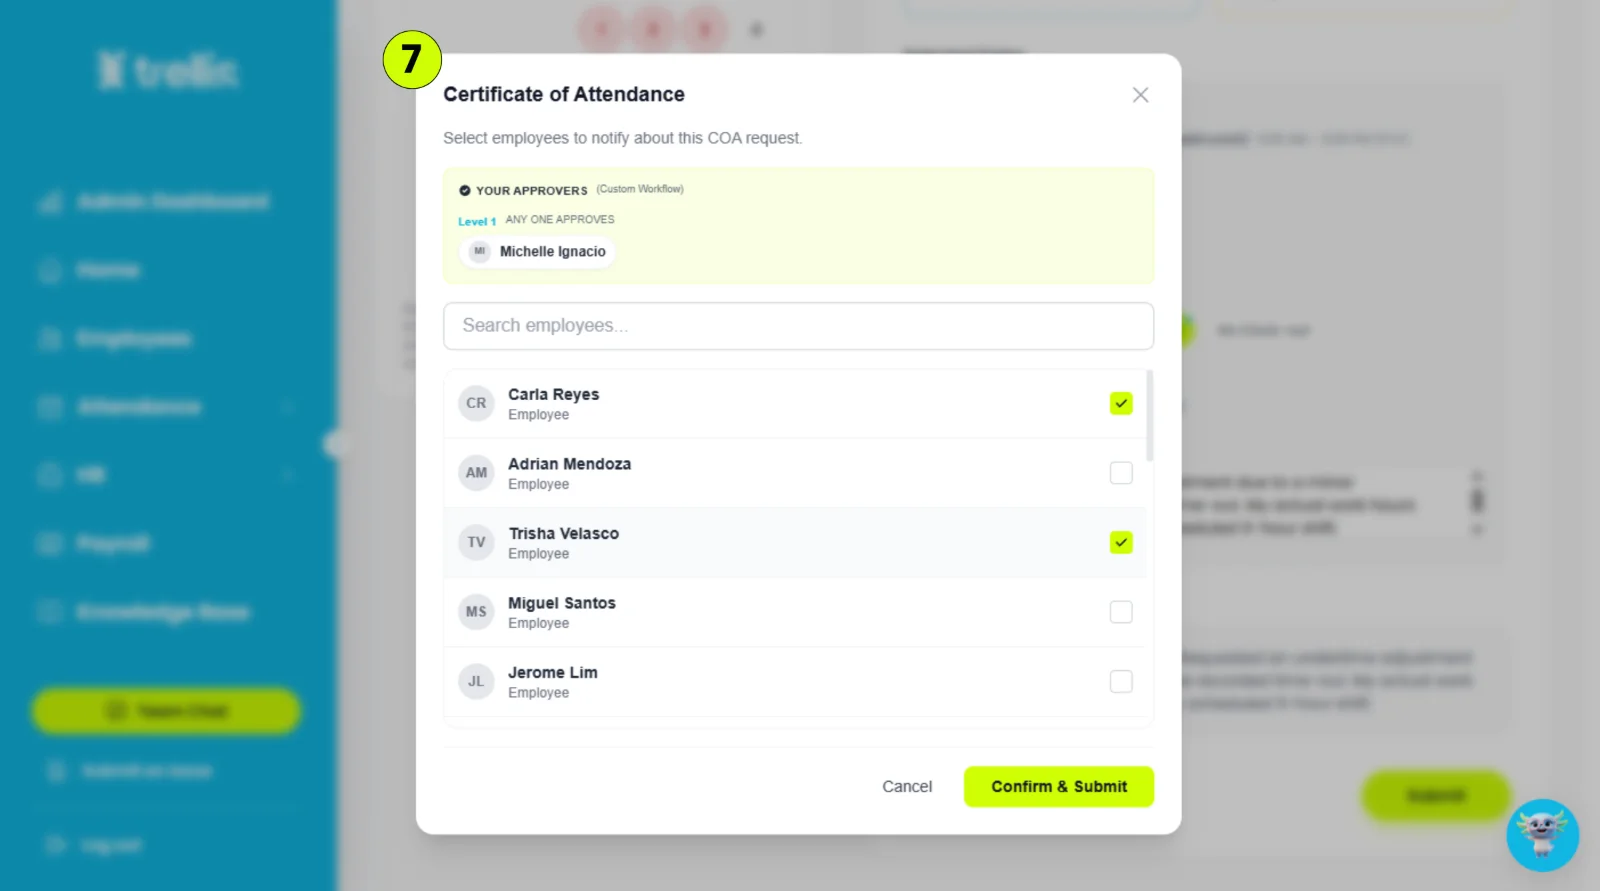
Select the employees you want to notify, then click "Confirm & Submit."
 Read the full guide →
From the sidebar, click "Home."
On the Dashboard, click "Requests."
On the Requests page, click "Overtime."
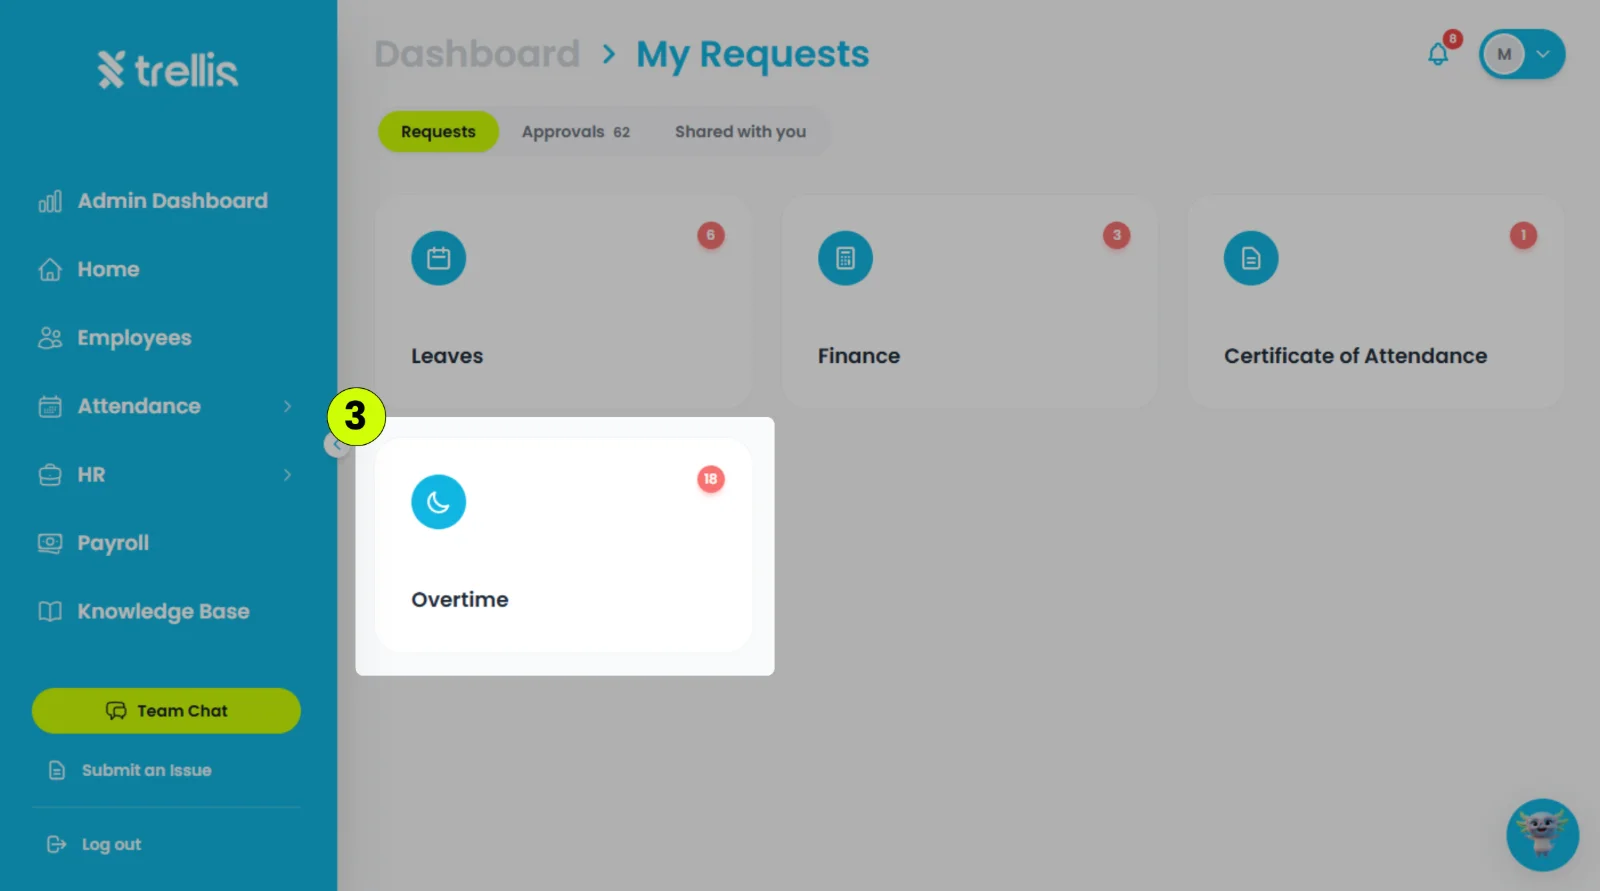
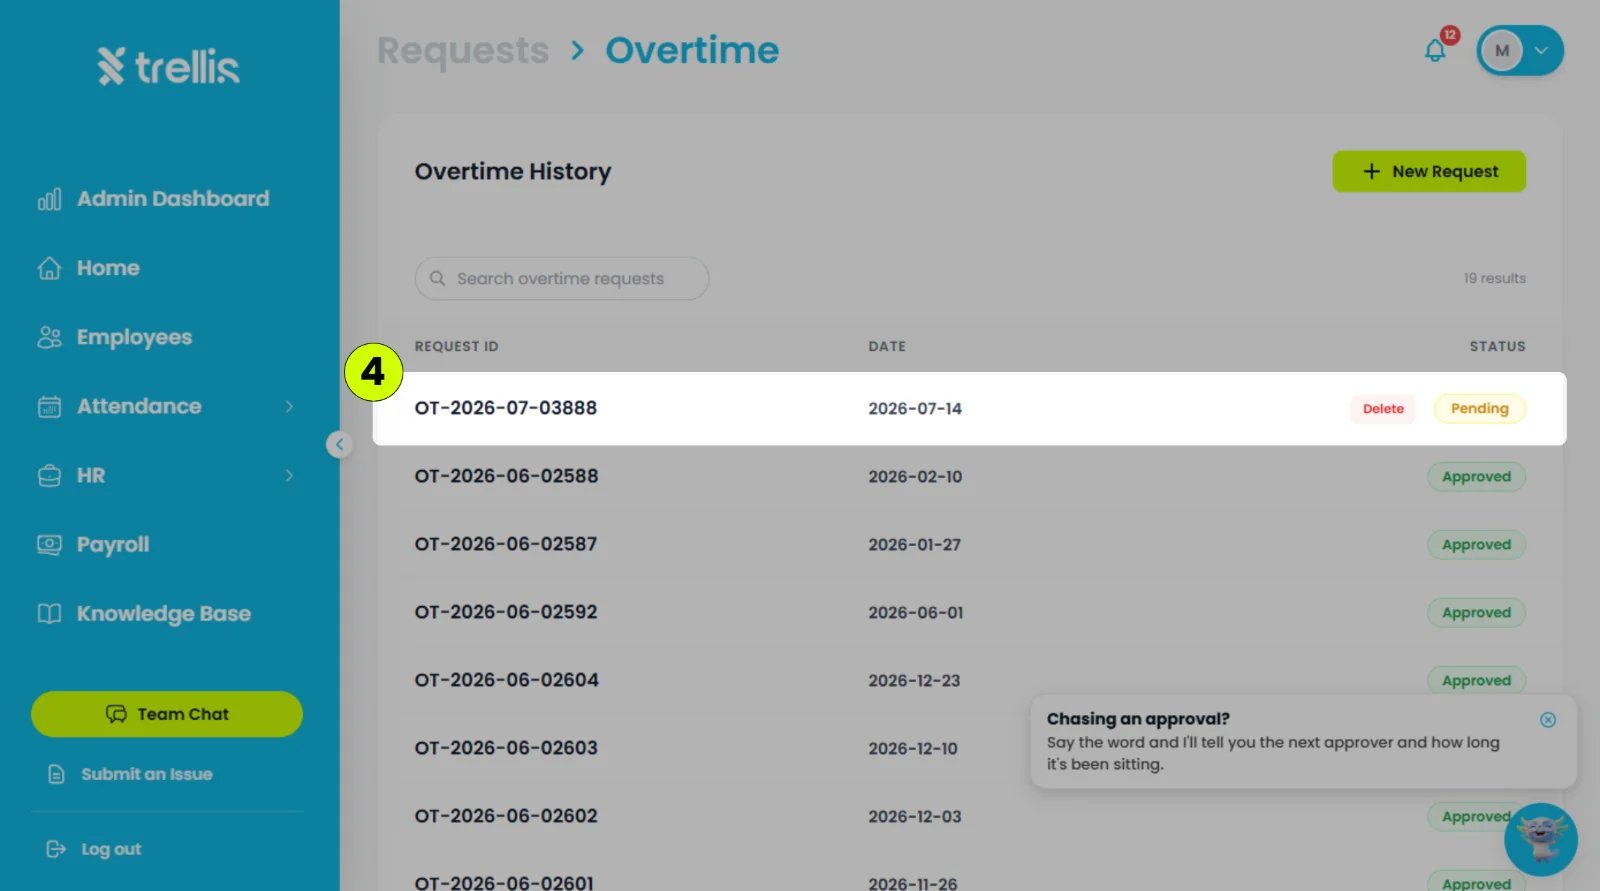
Locate the overtime request you want to delete, then click "Delete."
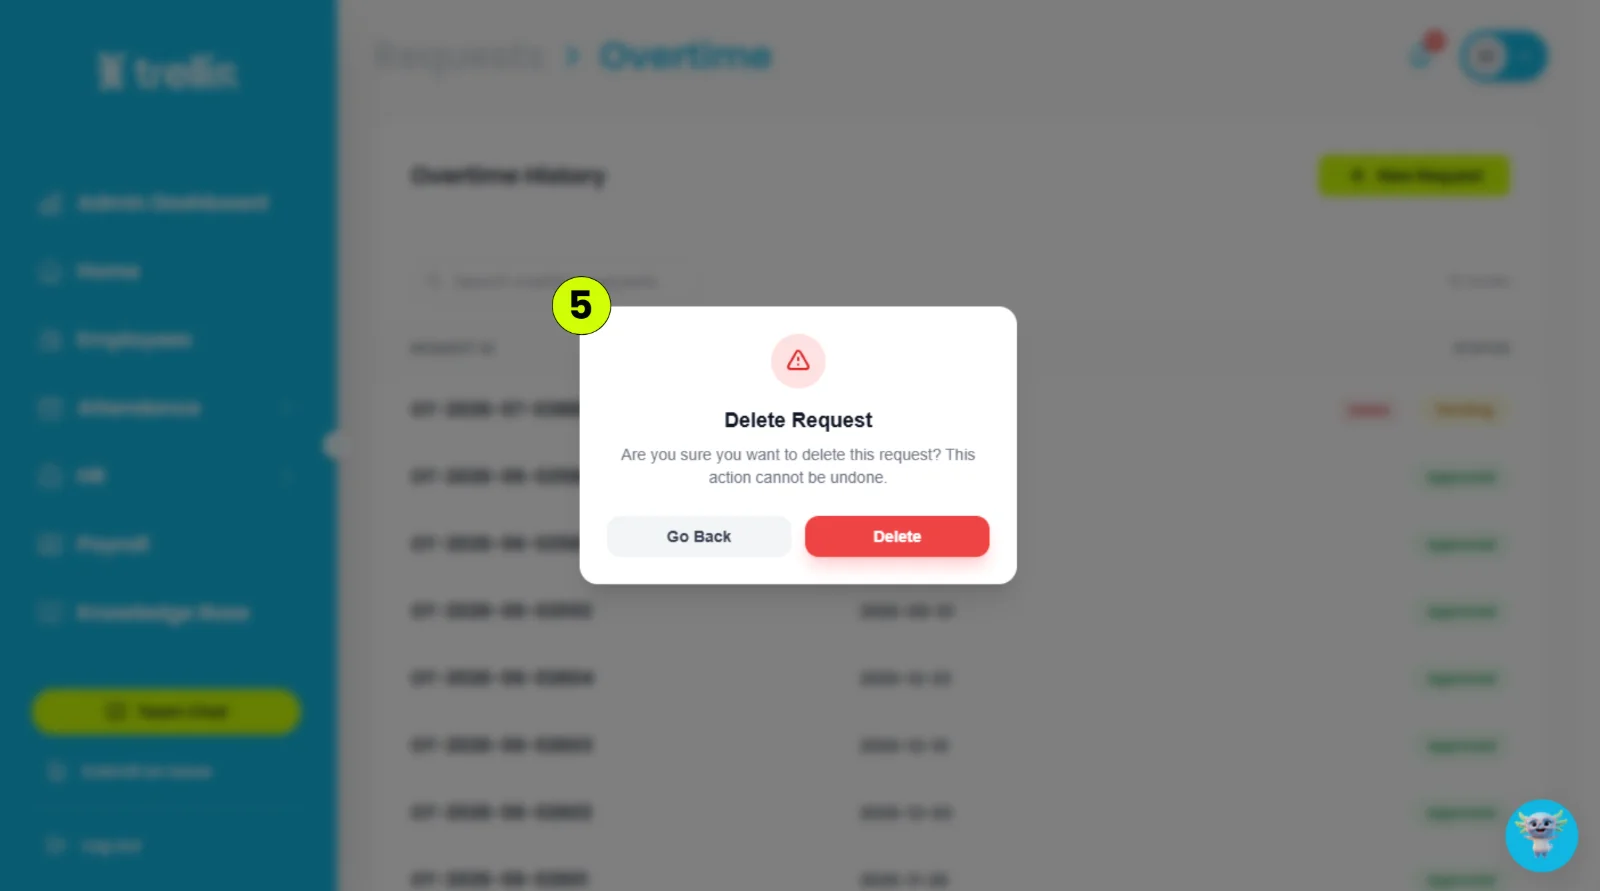
Click "Delete" again to confirm the deletion.
 Read the full guide →
From the sidebar, click "Home."
On the Dashboard, click "Requests."
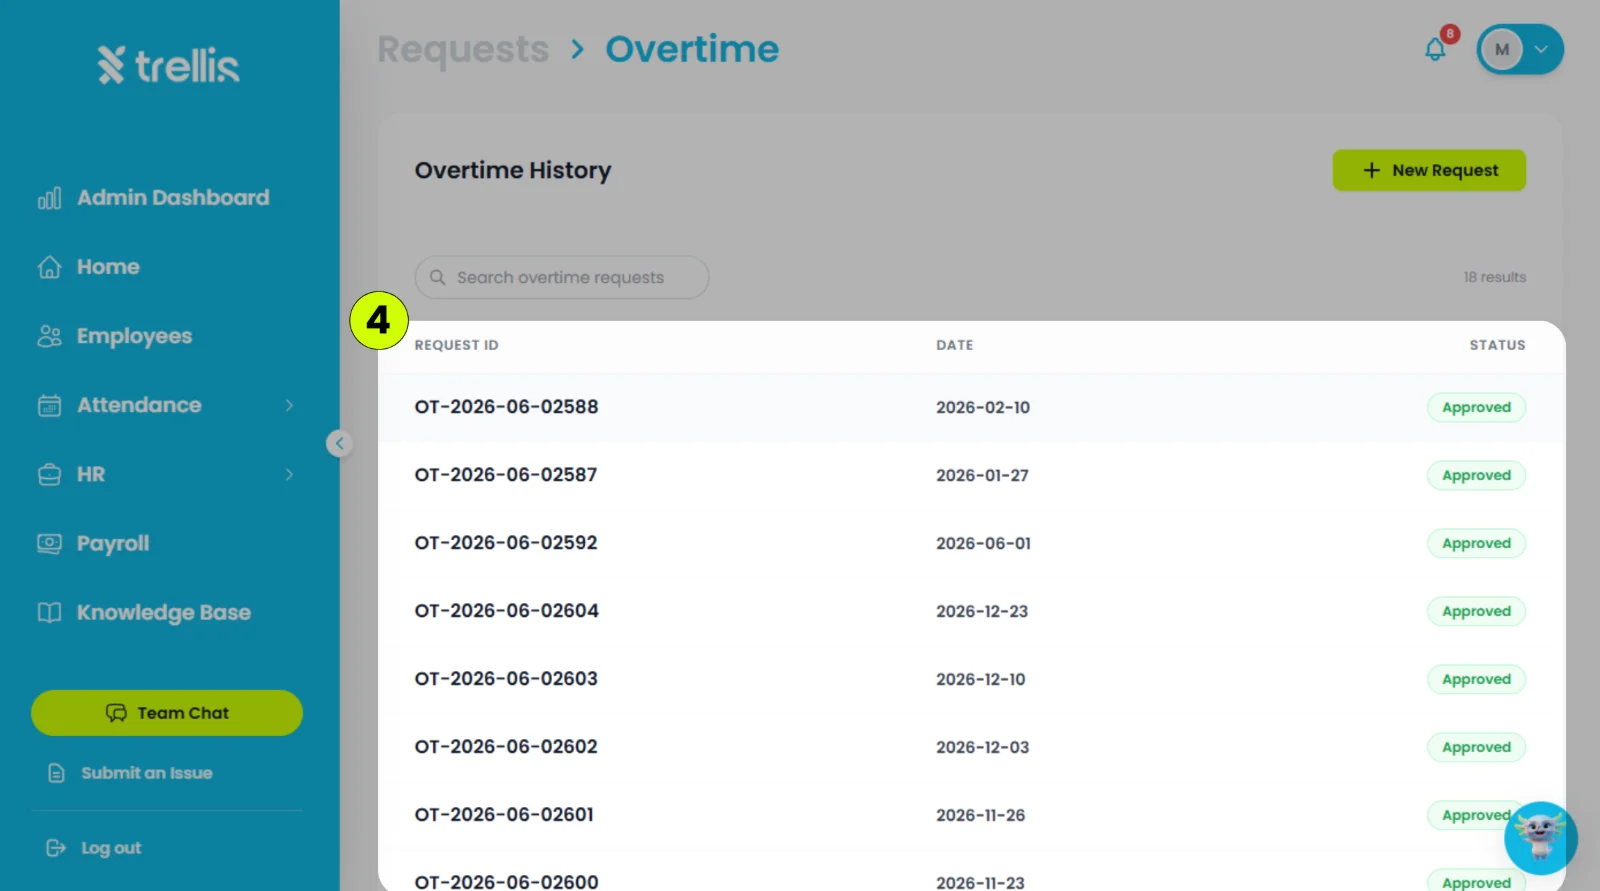
On the Requests page, click "Overtime."
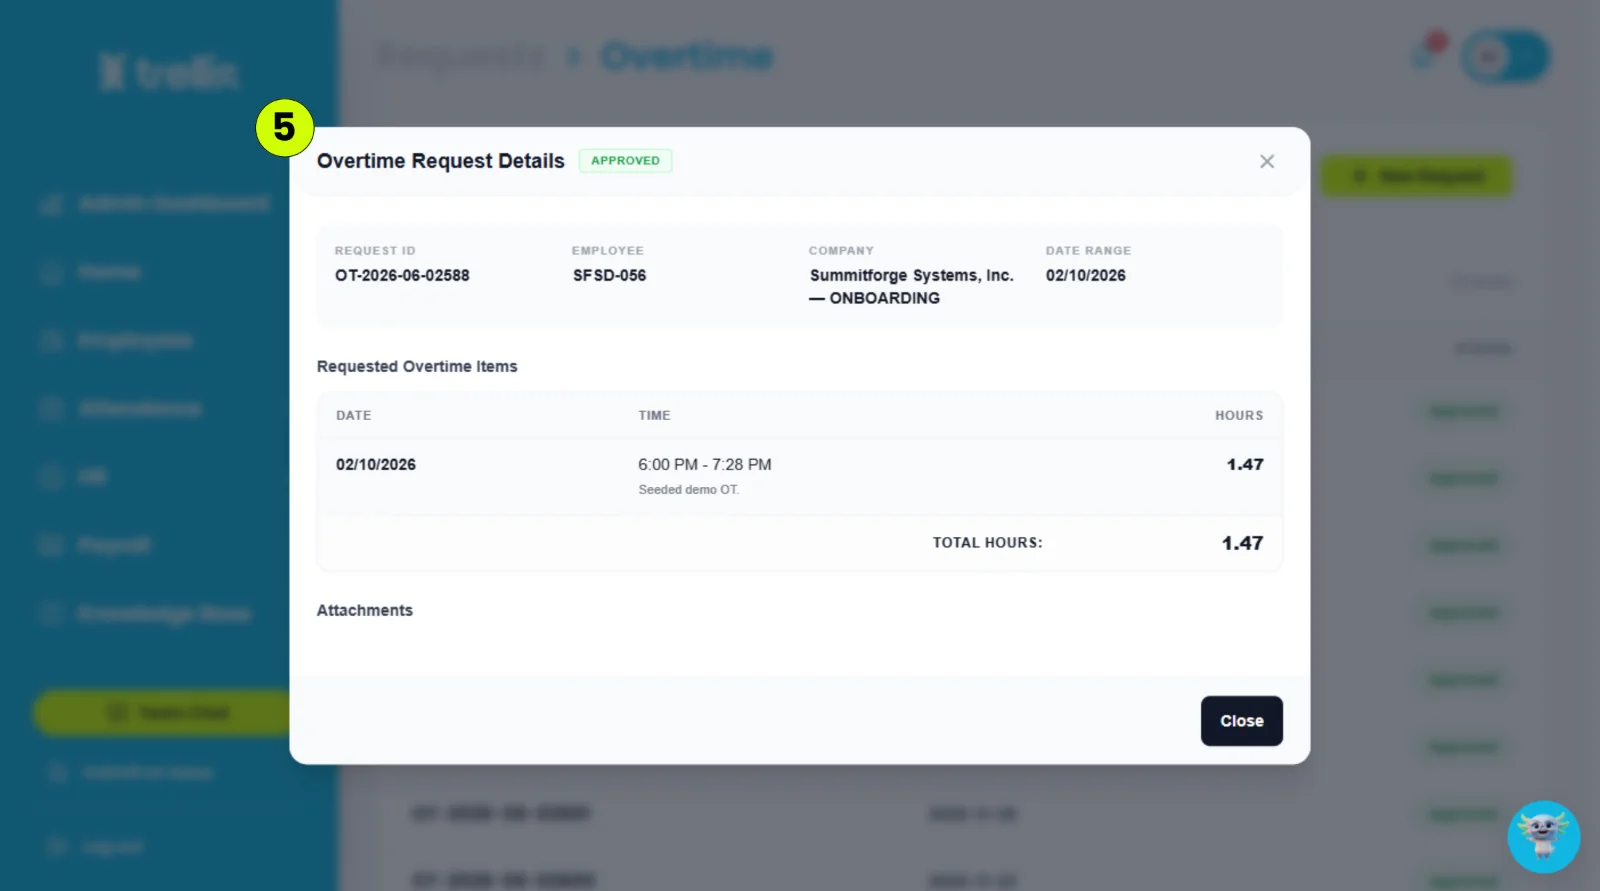
Select the overtime request you want to view.
The "Overtime Request Details" window will appear, displaying the request information, rendered hours, status, and any attached files.
 Read the full guide →
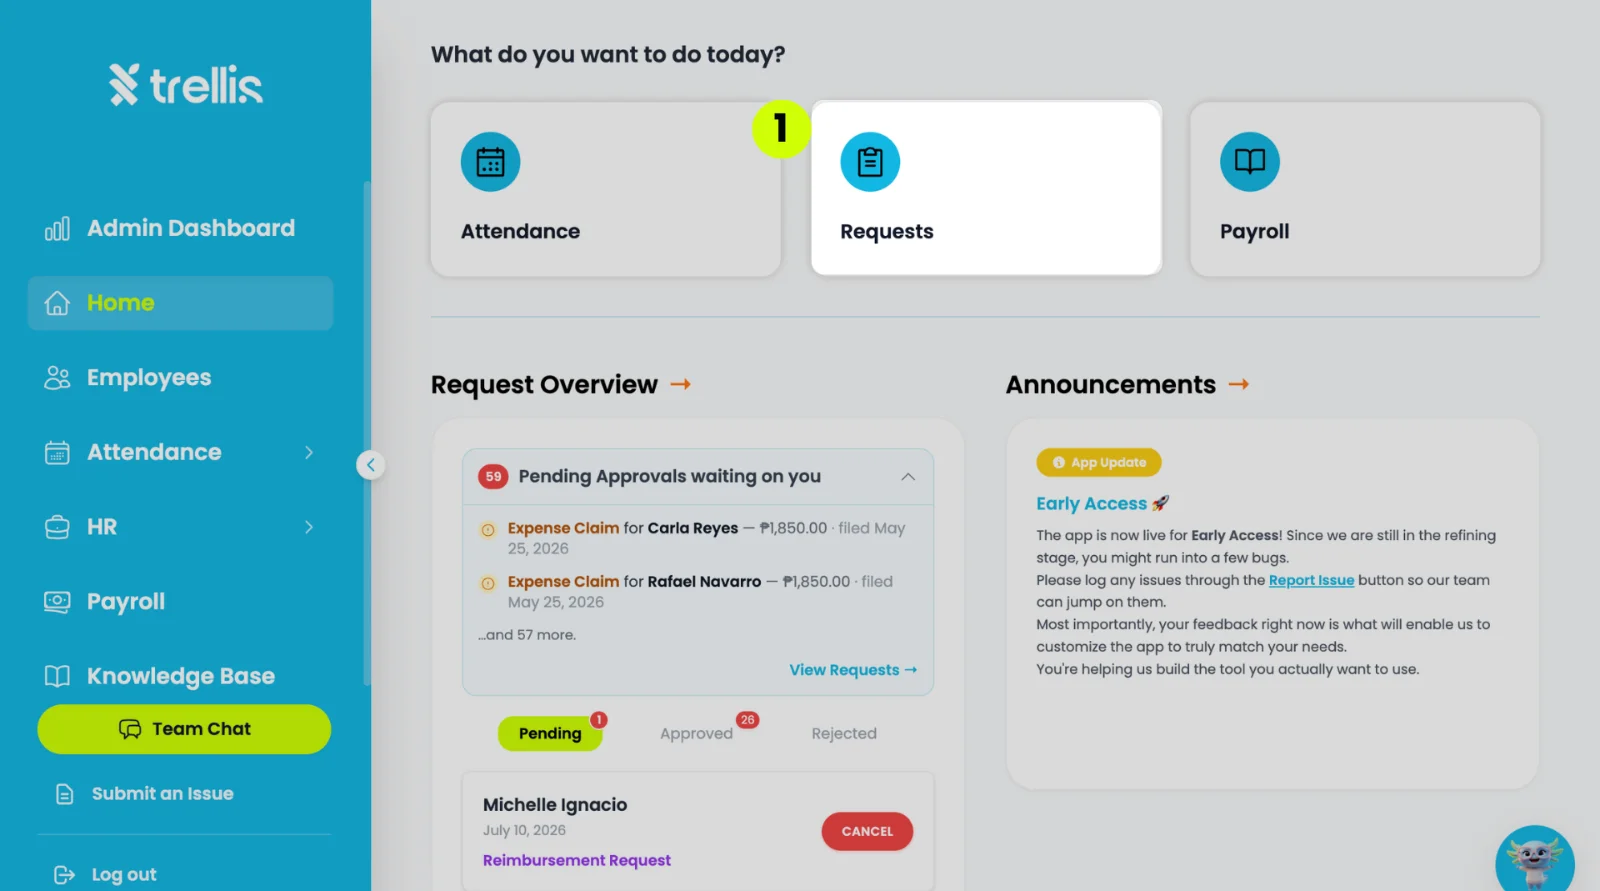
From the sidebar, click "Requests"
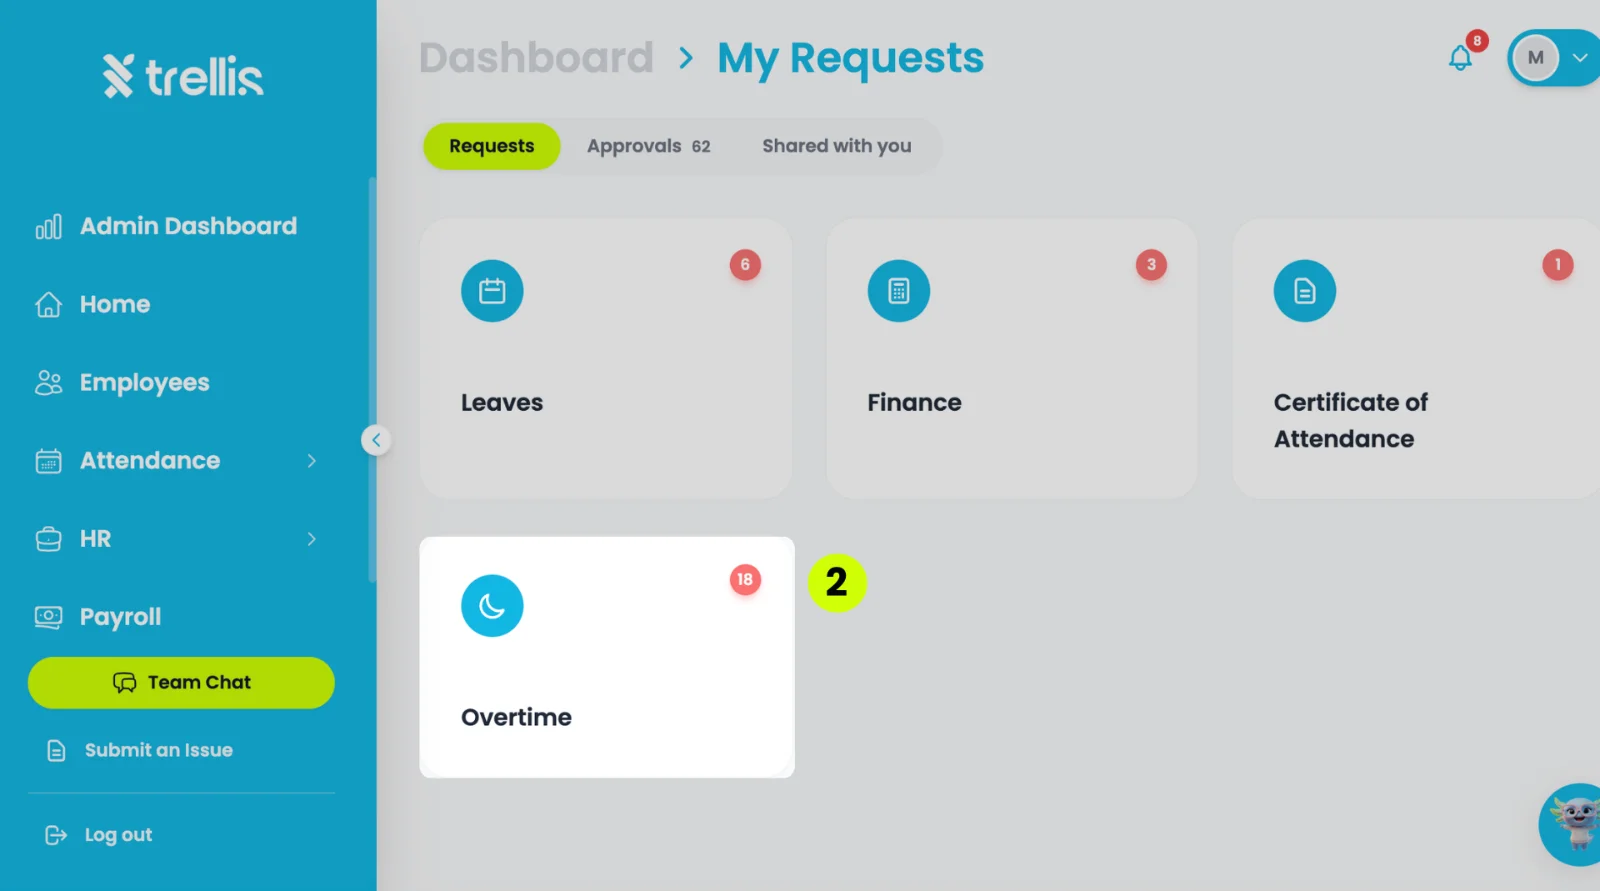
Select the "Overtime" tile.
Click “+ New Request.”
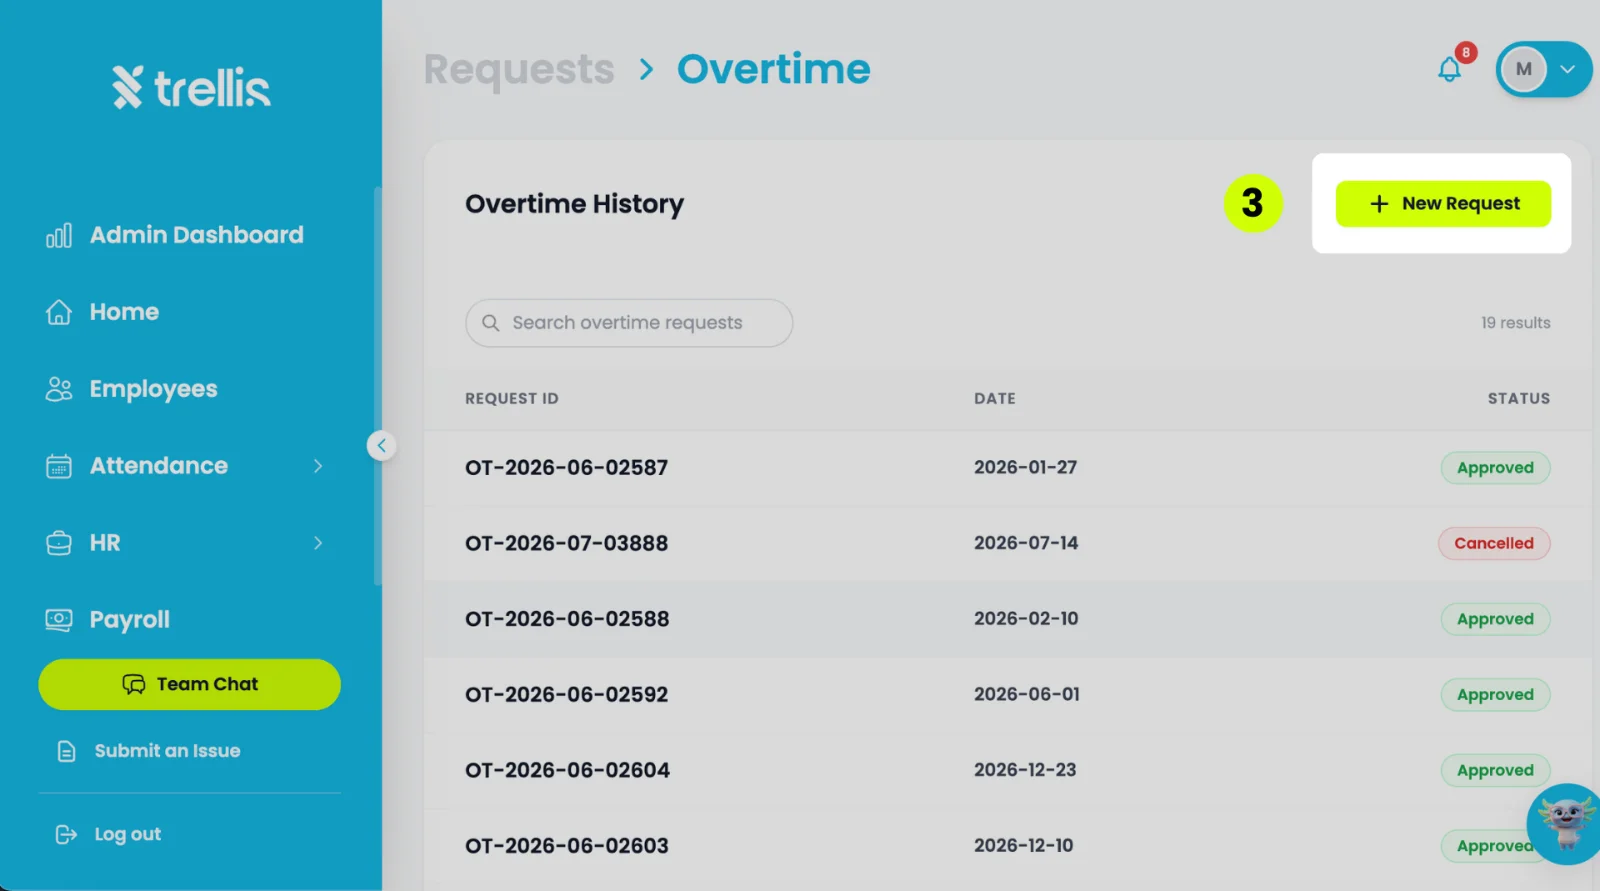
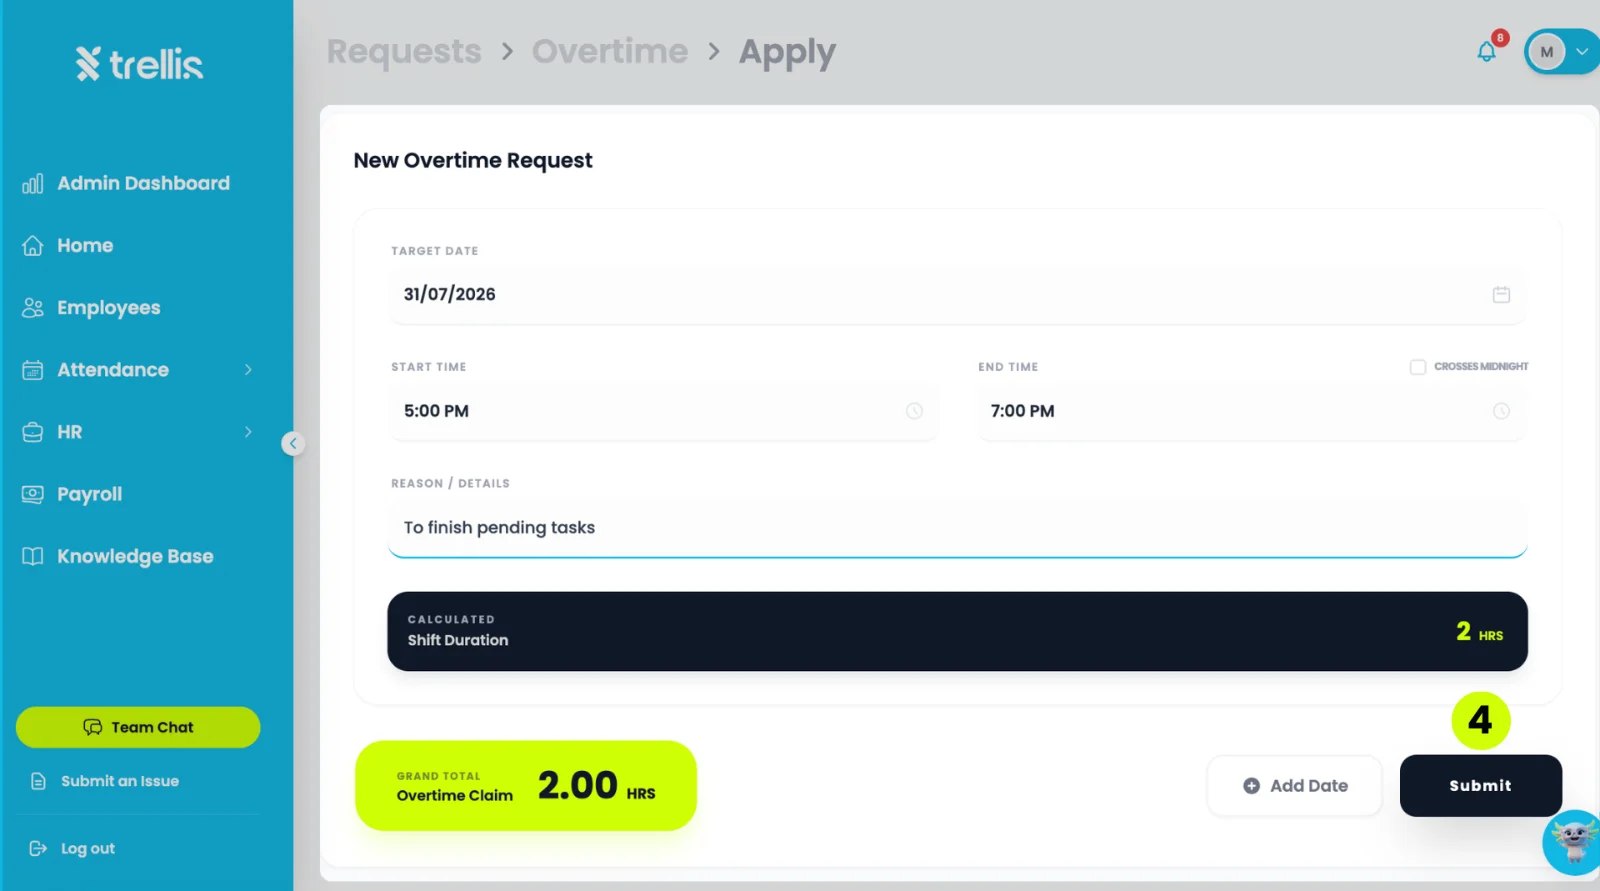
Fill in the "Target Date", "Start/End Times", and "Reason", then click the "Submit" button to send your request.
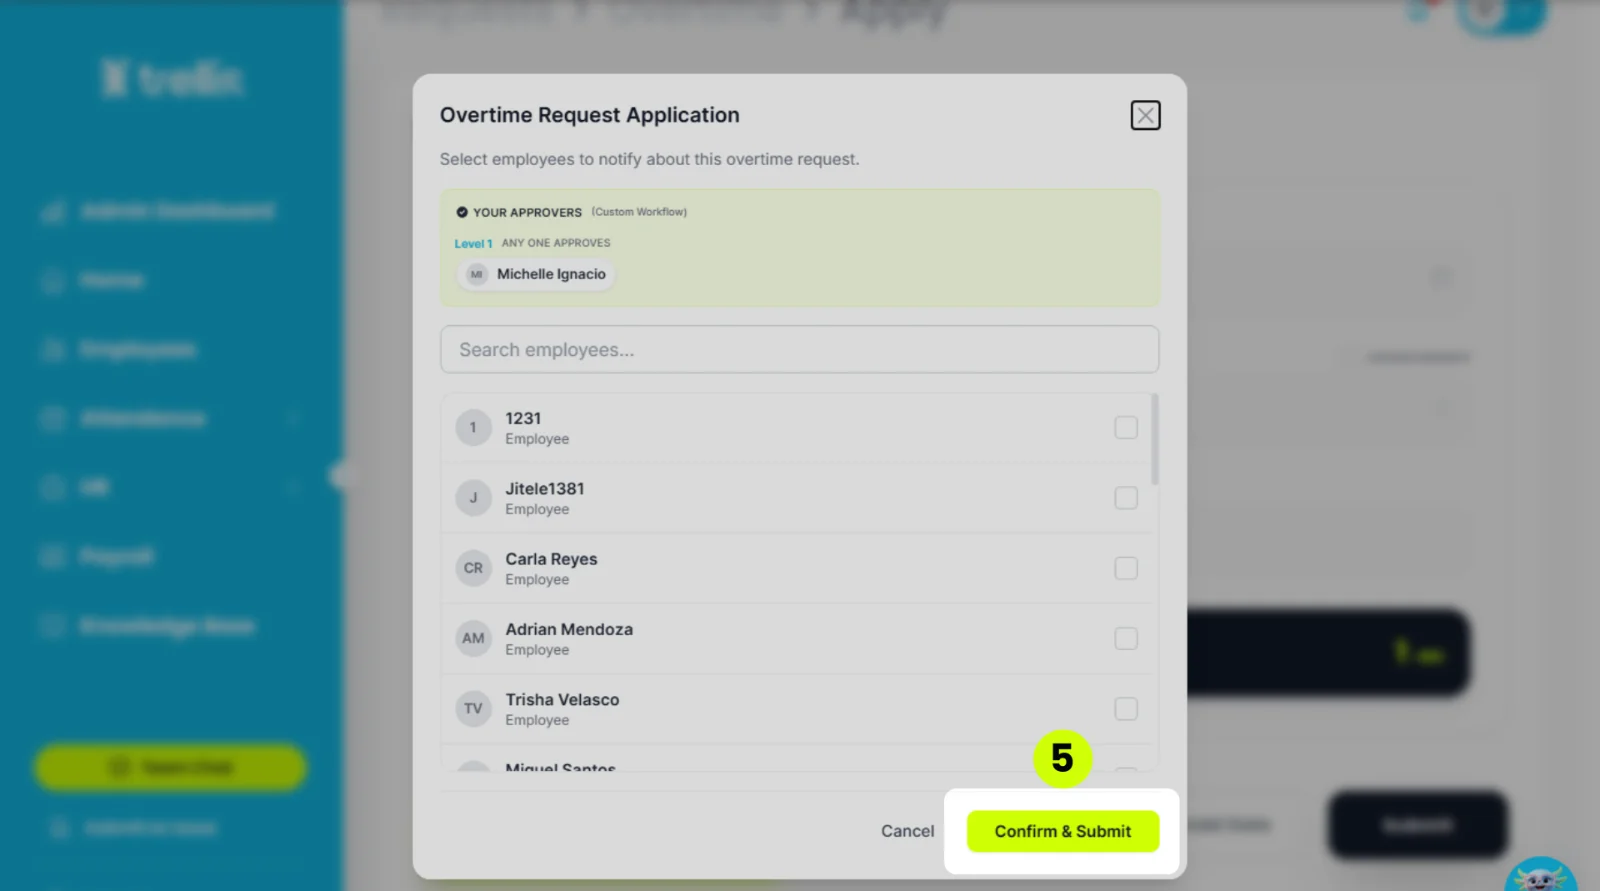
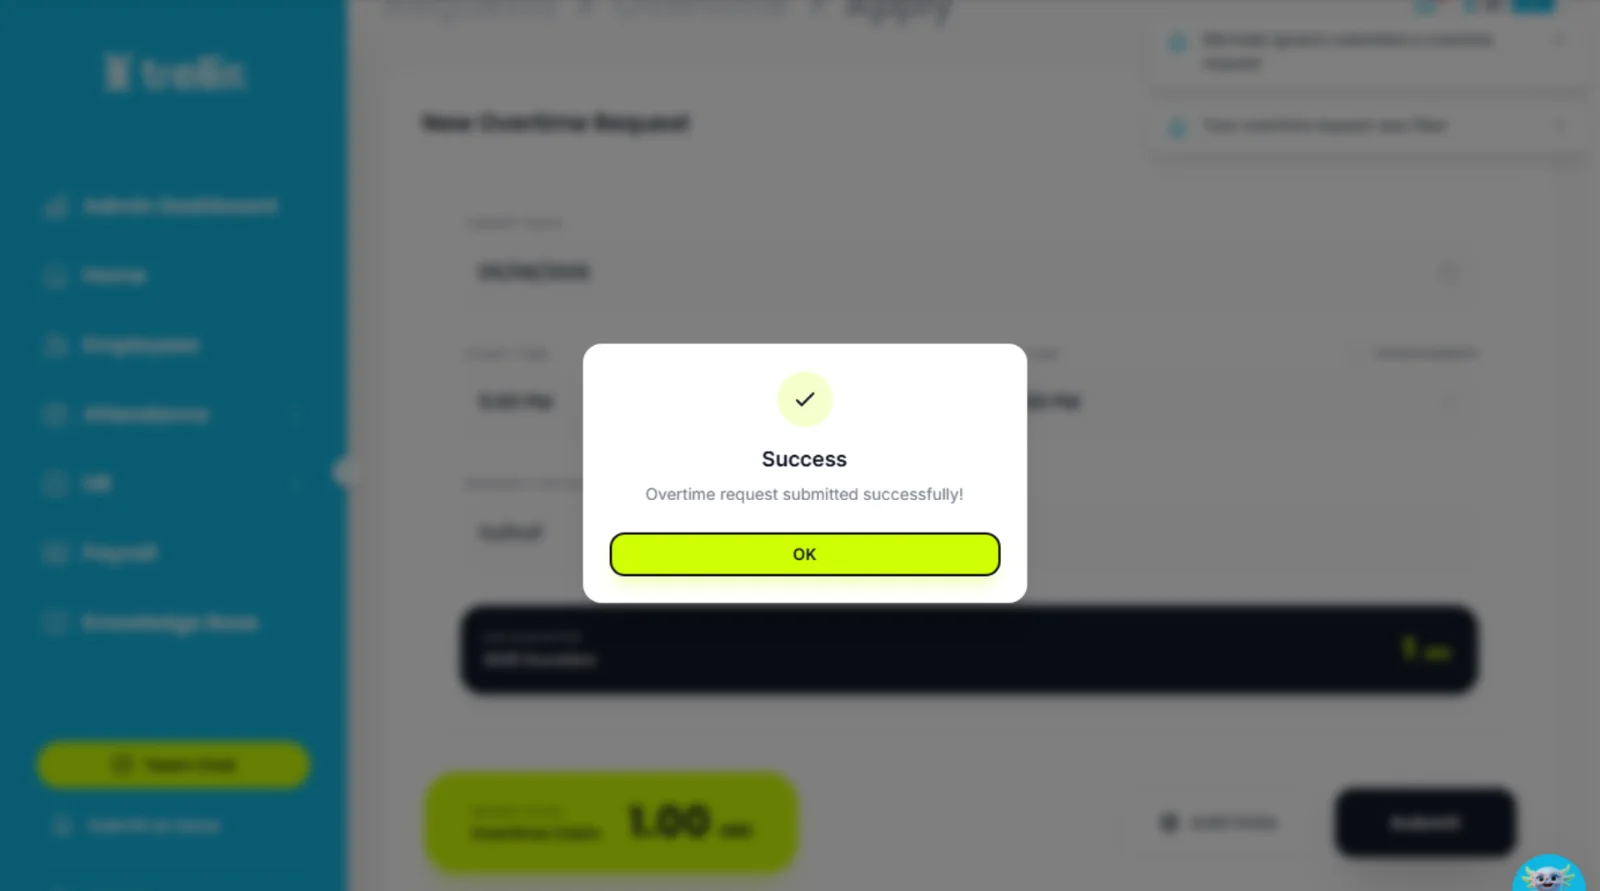
Select employees to notify about the overtime request. After that, press “Confirm & Submit”. Finally, once the "Success" pop-up appears, click "OK" to complete the activity and return to the home screen.
From the sidebar, click "Home."
On the Dashboard, click "Requests."
On the Requests page, click "Certificate of Attendance."
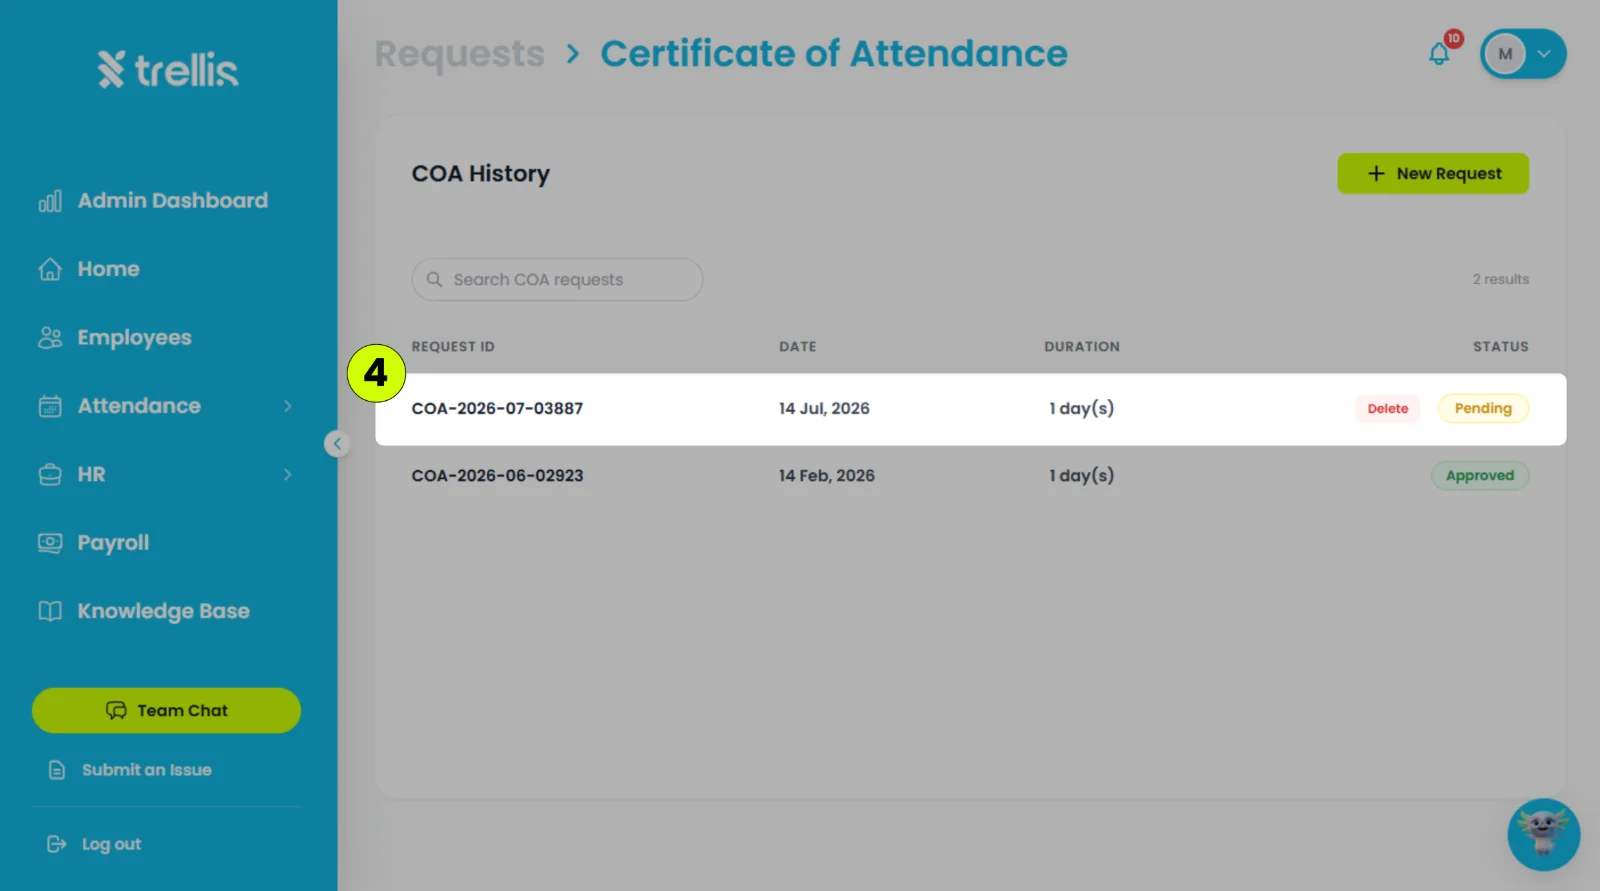
Locate the COA request you want to delete, then click "Delete."
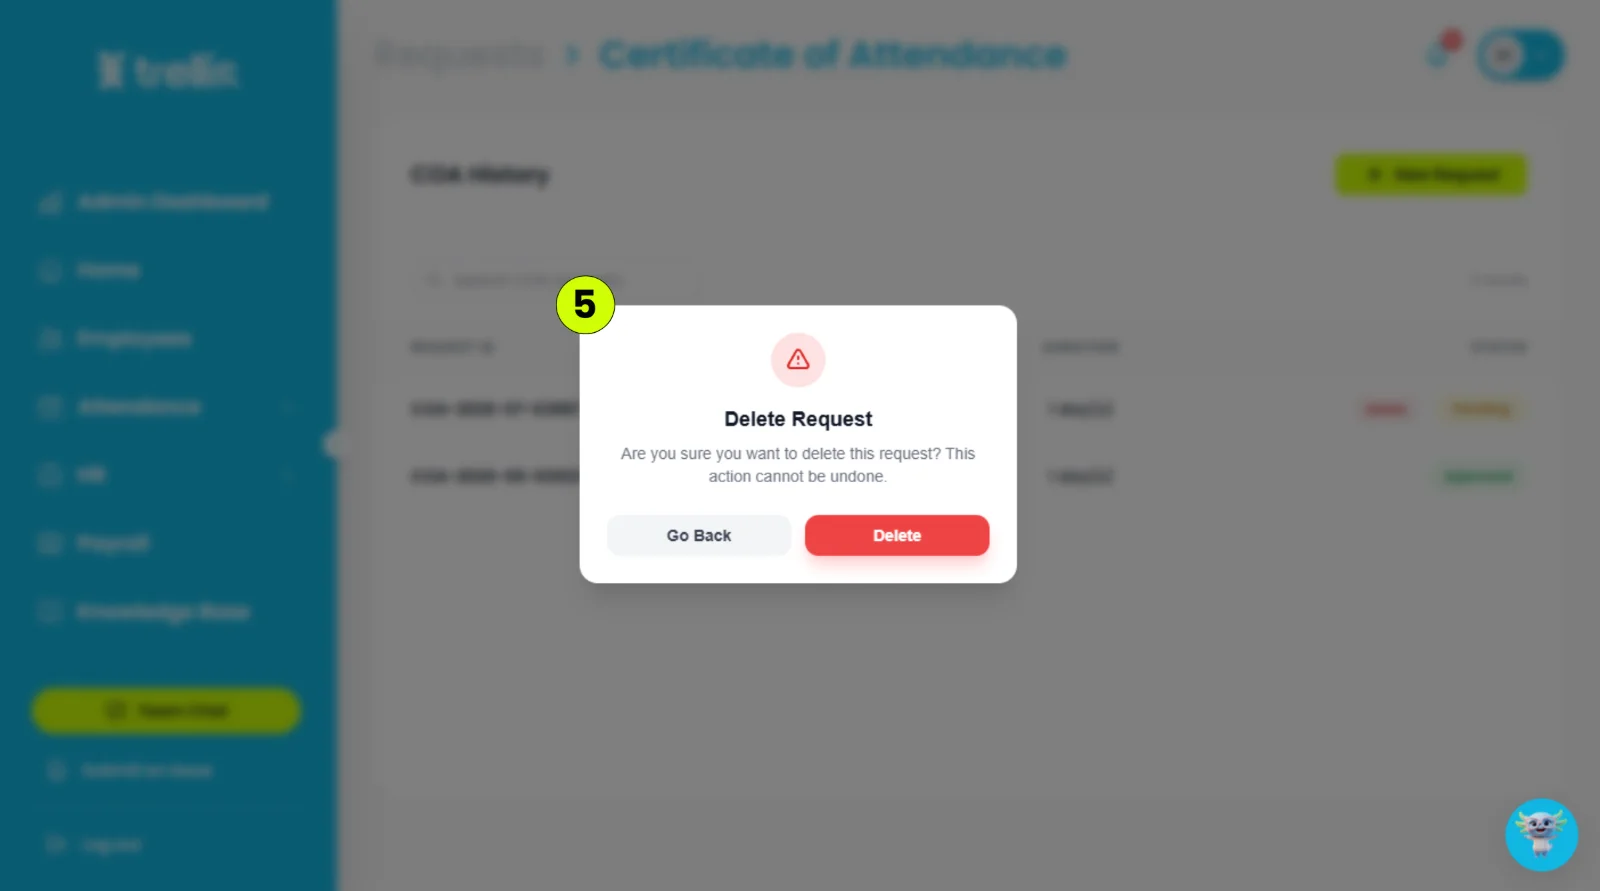
Click "Delete" again to confirm the deletion.
 Read the full guide →
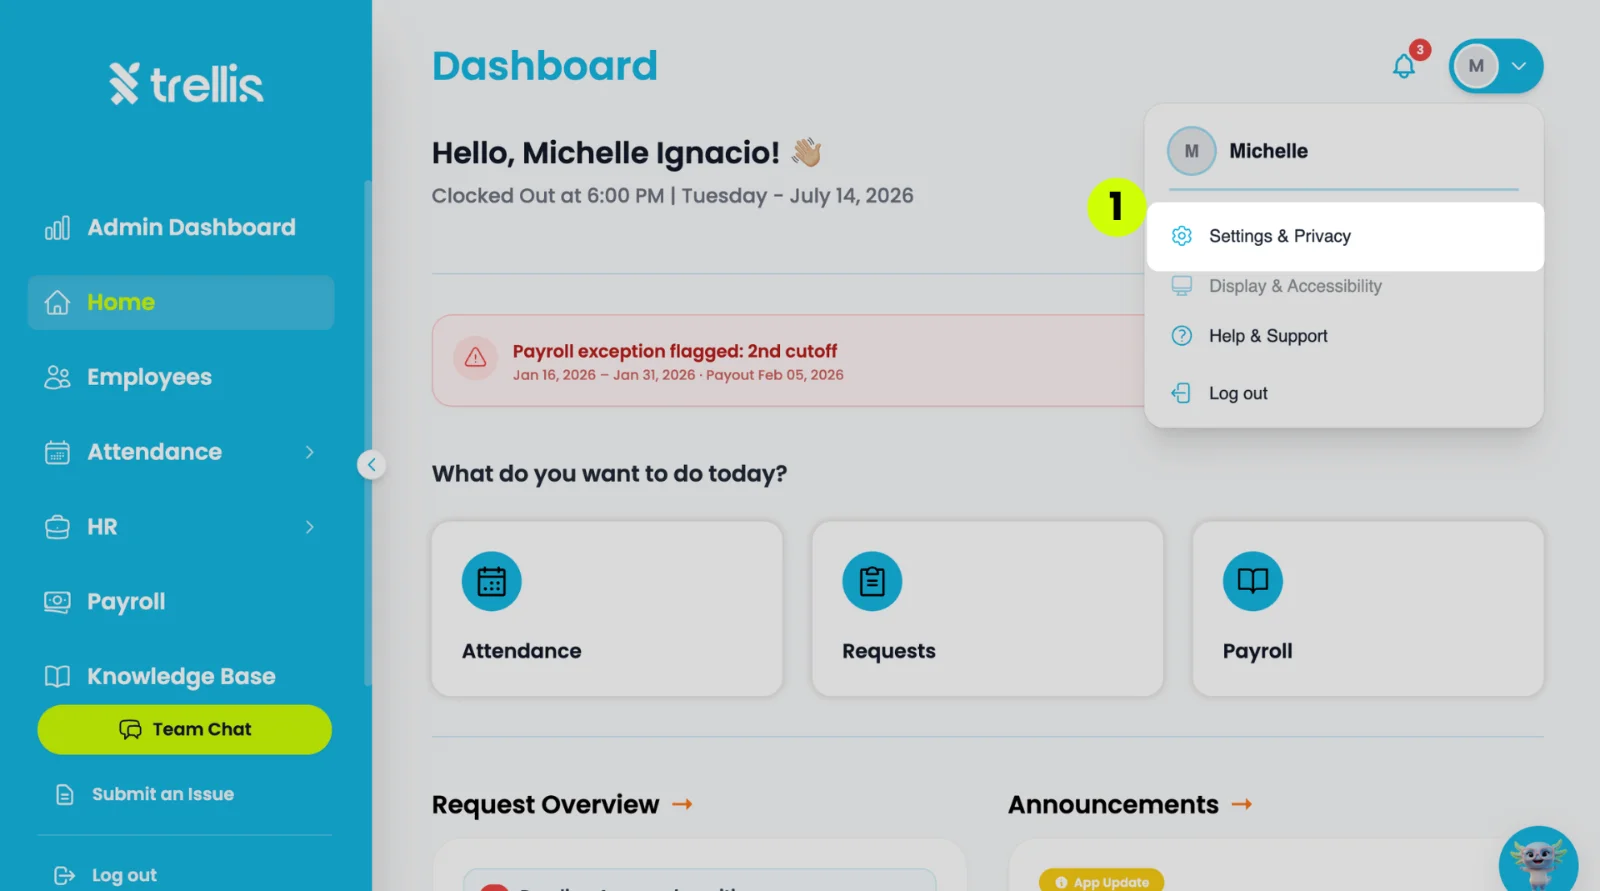
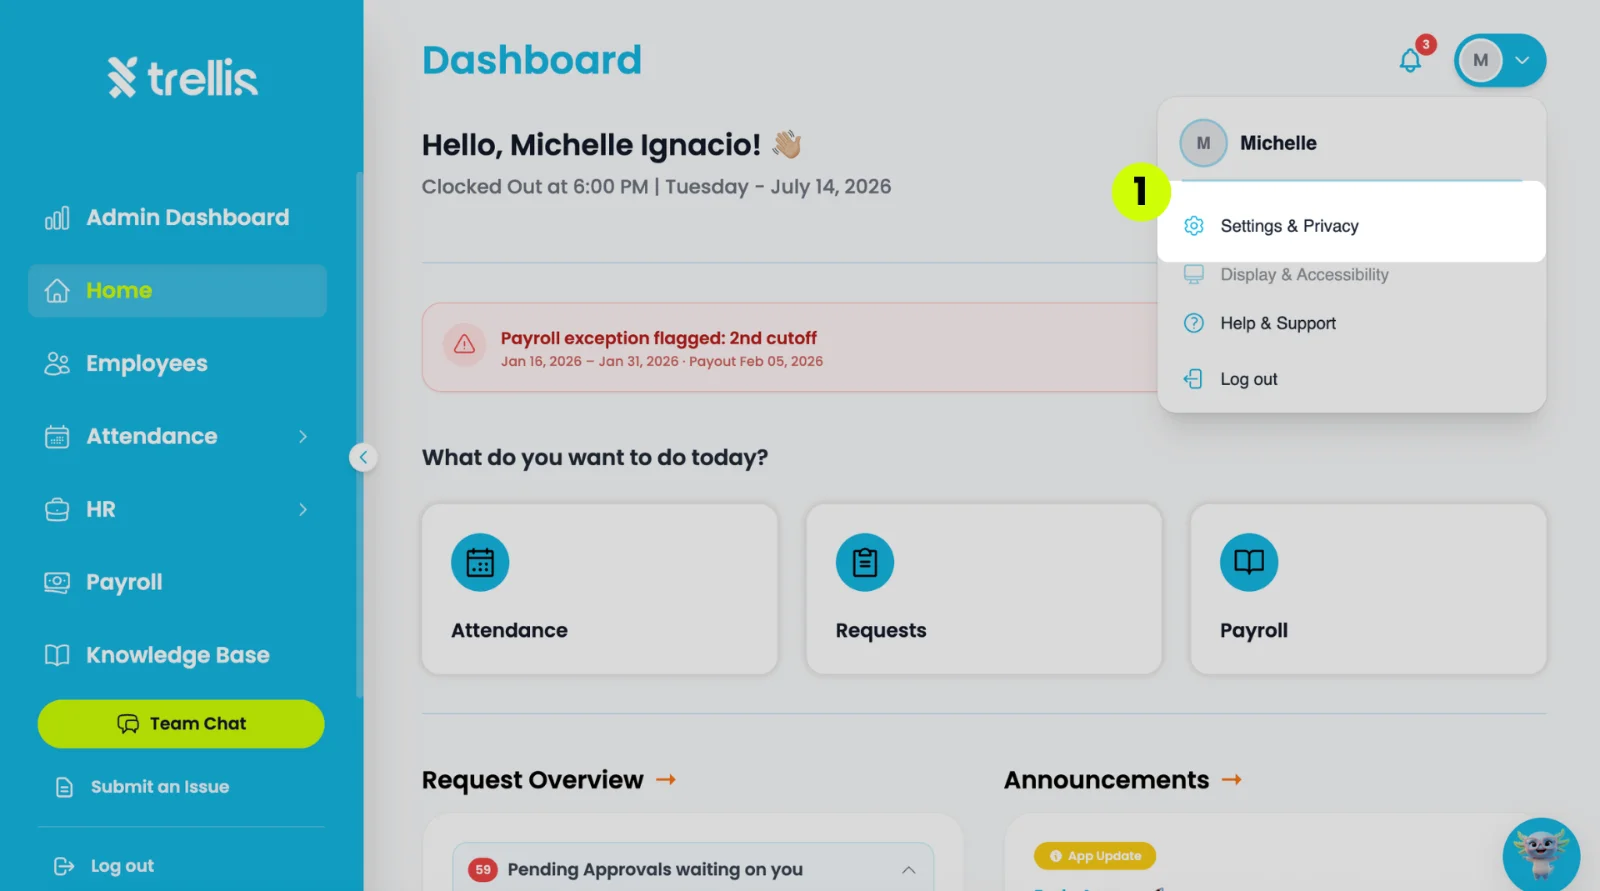
Click your profile icon at the top right, then select “Settings & Privacy”.
From the sidebar, click "Company Profile."
Select “Approval Settings” tab.
Click the dropdown button “+Add approver…” to display the employee list.
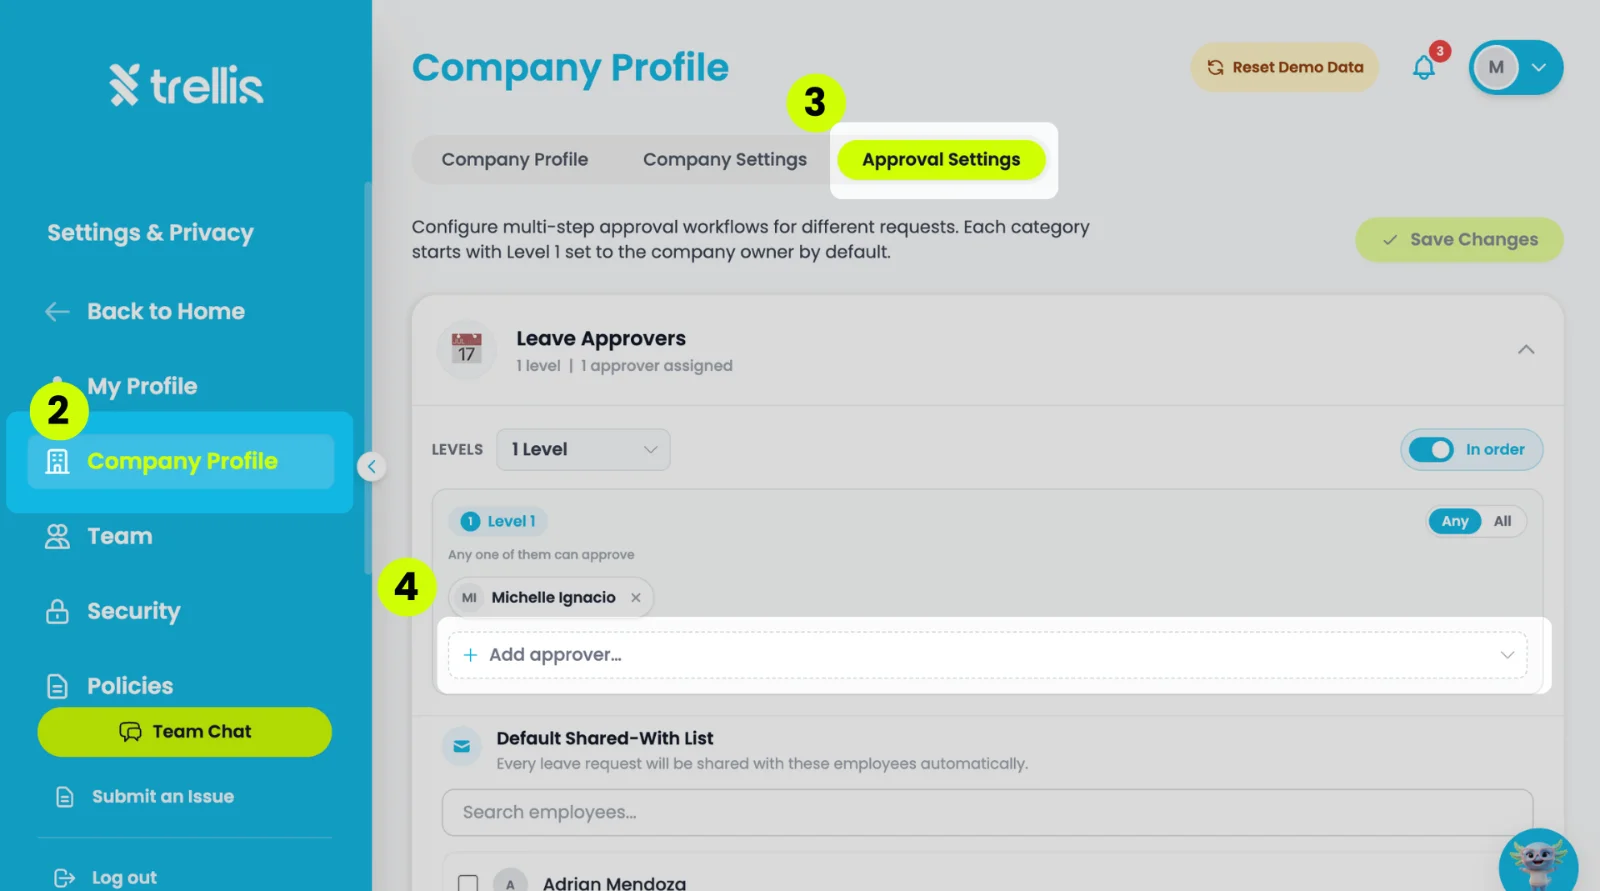
Select the names from the employee list that will be assigned as default approver.
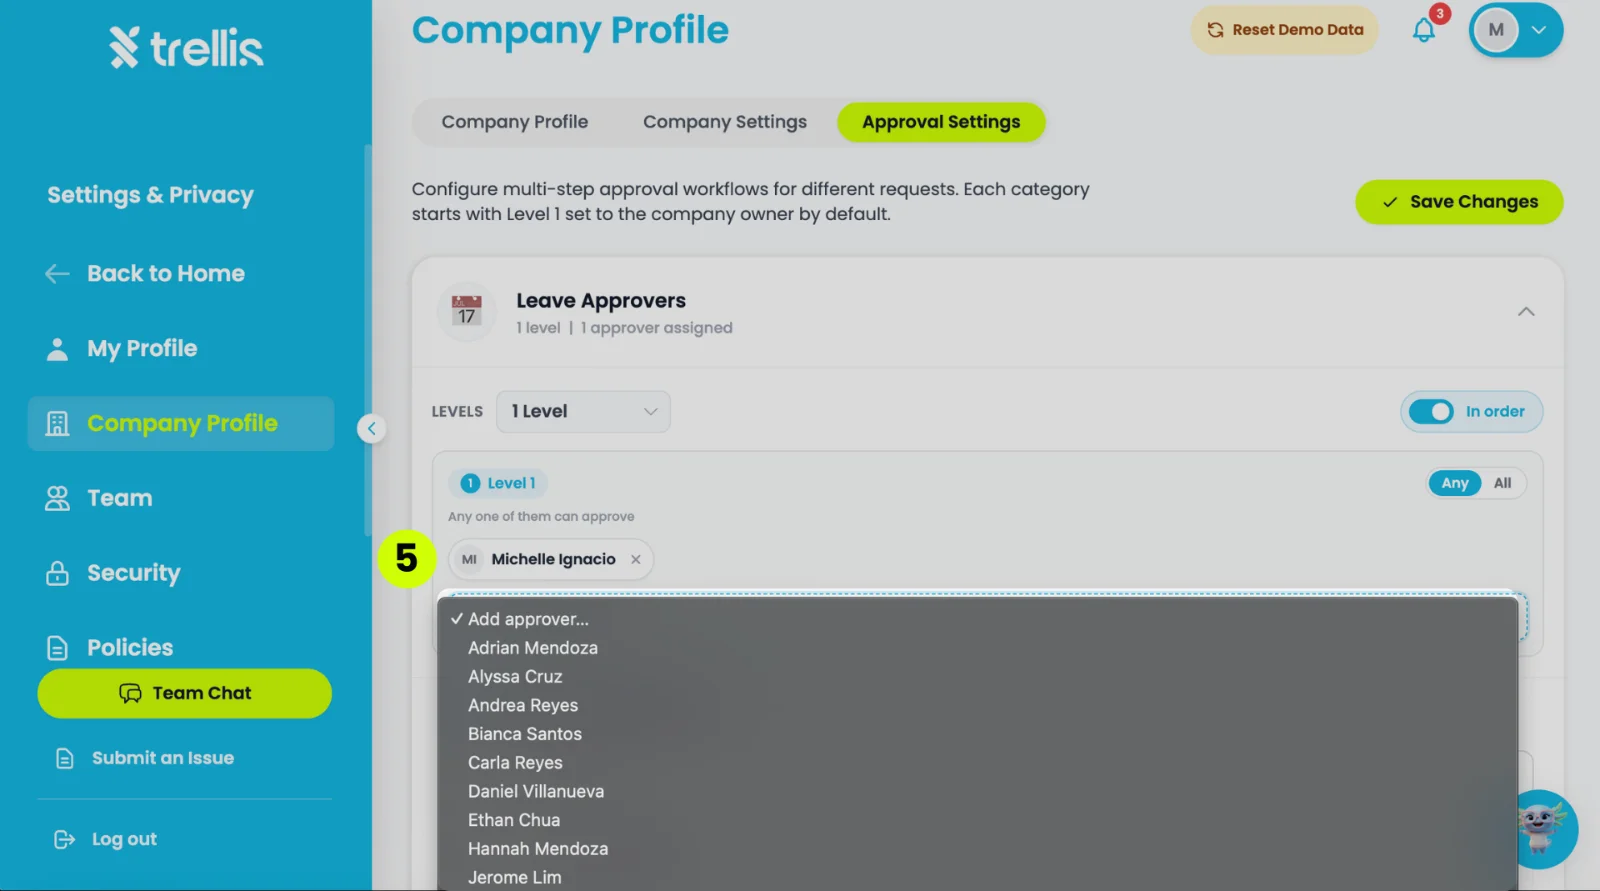
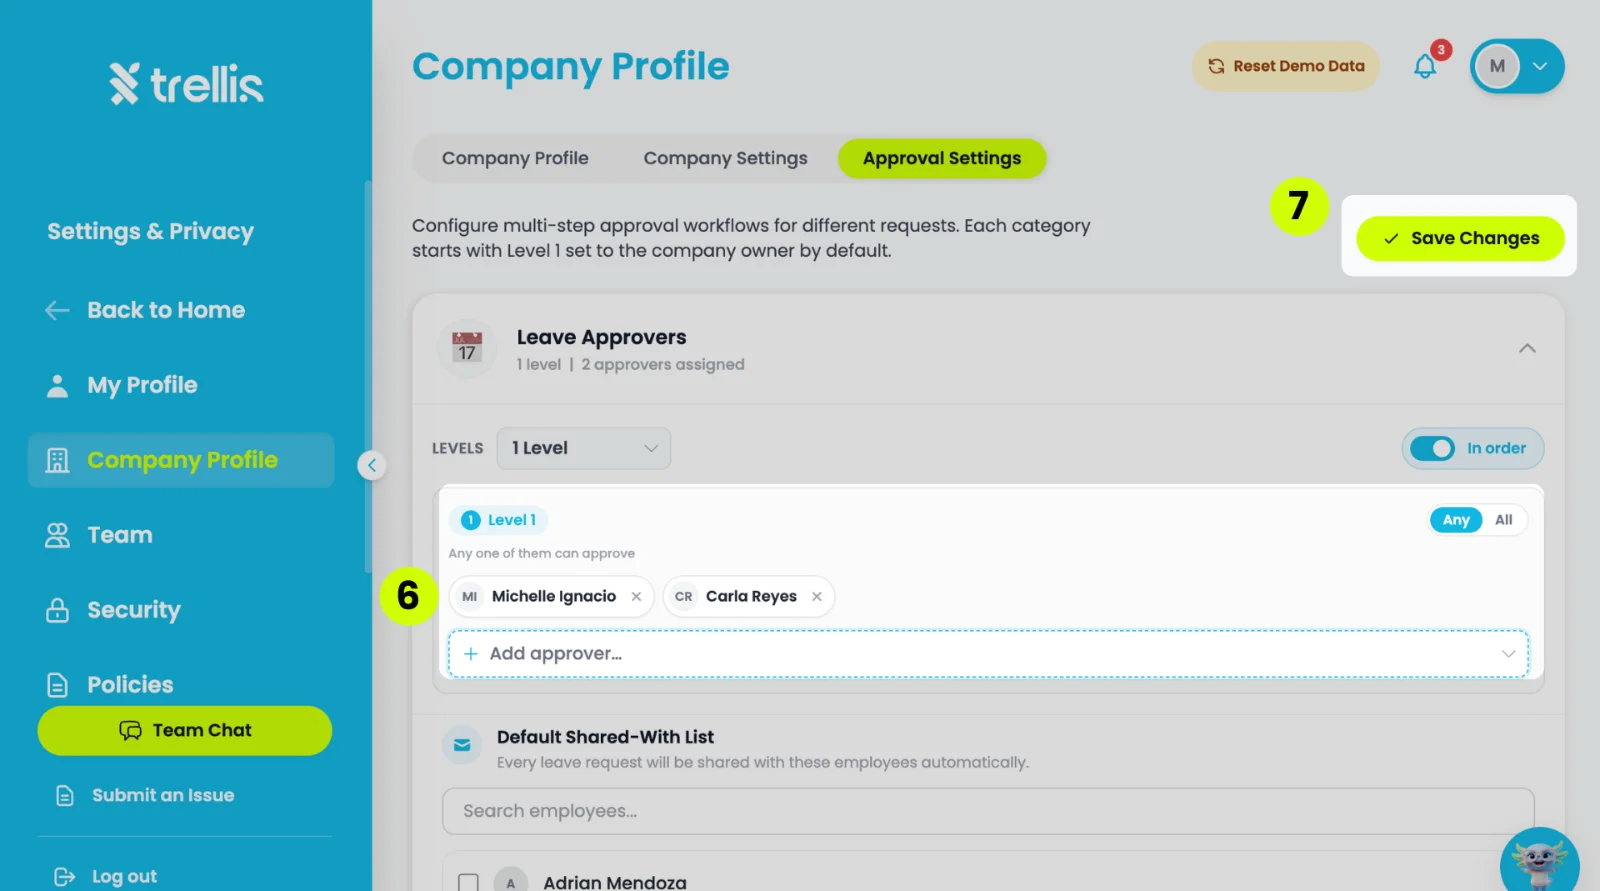
Finalize the list of employees that will be default approvers.
Click “Save Changes.”
Click your profile icon at the top right, then select “Settings & Privacy”.
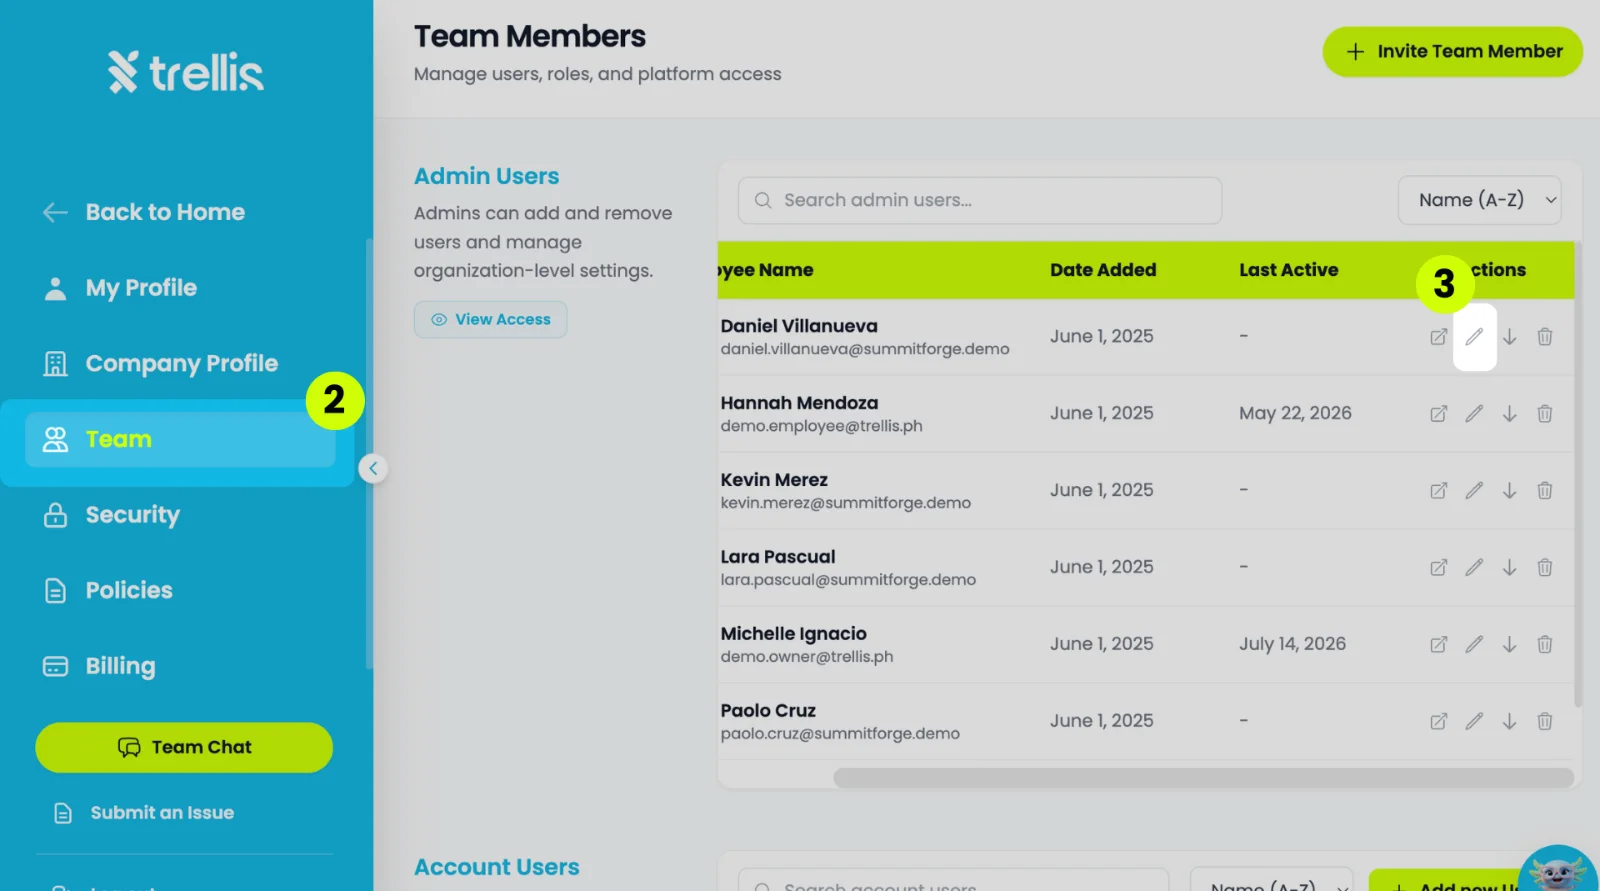
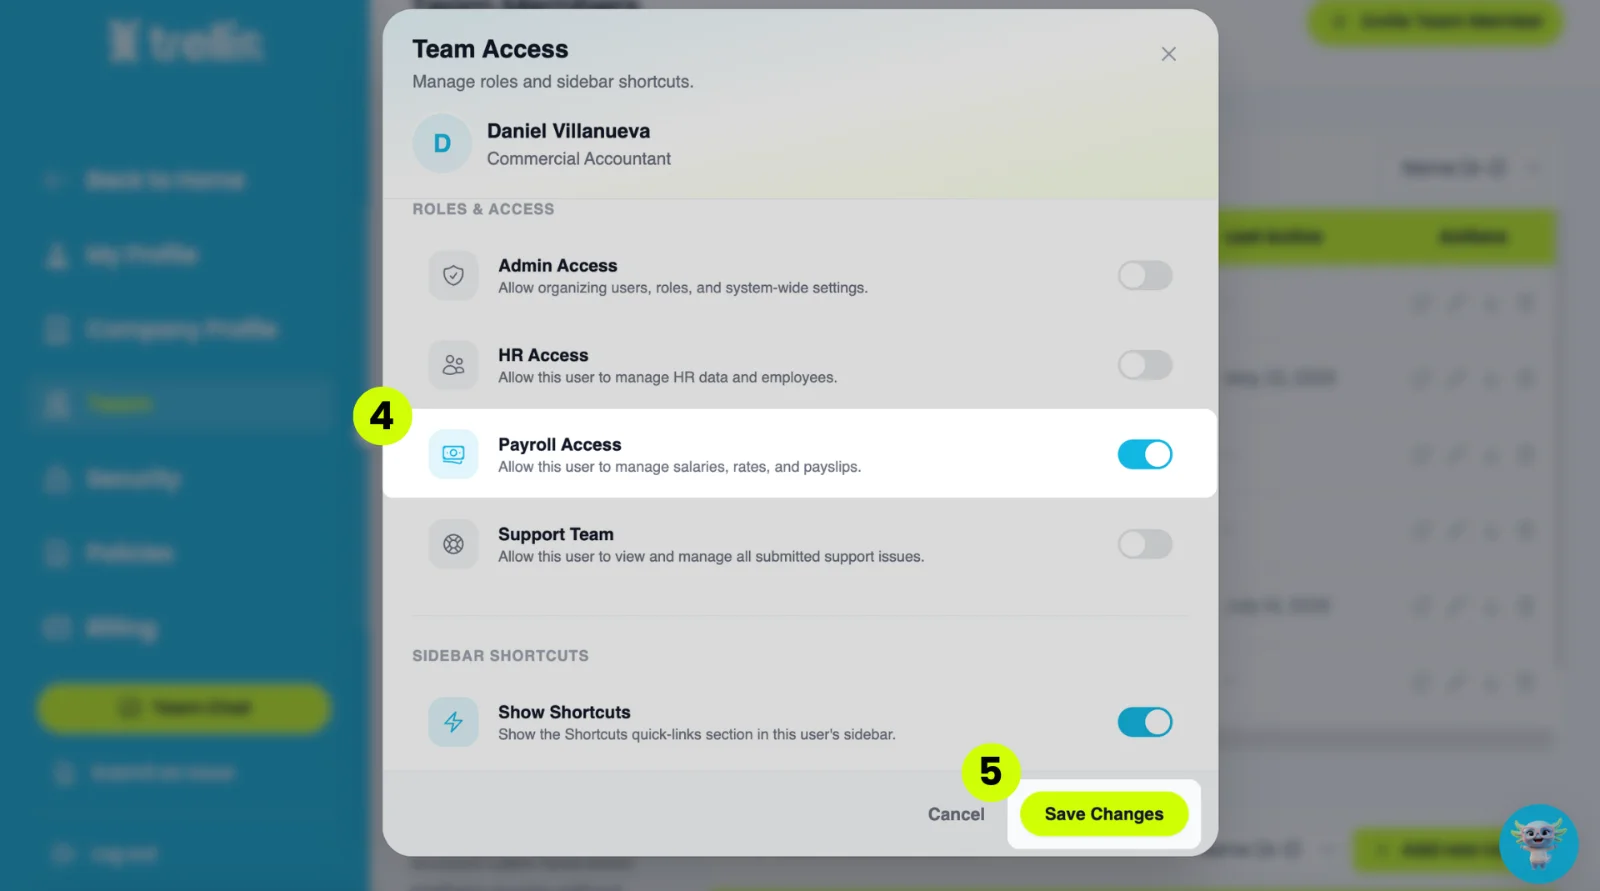
Select "Team" and then locate the employee whose access you want to customize.
In the “Actions” column, click edit icon.
In “Team Access” select the toggle button beside “Payroll Access.”
Click the “Save Changes" button.
From the sidebar, click "Home."
On the Dashboard, click "Requests."
On the Requests page, click the "Approvals" tab.
Find the leave and click its check-mark button.
Add a note if you like, then click "Approve."
Trellis asks "Approve over attendance?" Click "Approve leave" to go ahead. On a full-day leave, the leave replaces that day's attendance. On a half-day leave, the half they worked still counts.
If the leave has more than one approver, this question appears at the final approval.
A leave can't be approved over overtime that was already approved for the same hours. Cancel that overtime request first, then approve the leave.
Read the full guide →Leave accrual adds leave credits to your employees automatically, every month. You set the rule once — for example, 0.5 days of Vacation Leave a month — and Trellis credits everyone on the rule on the 1st of each month, for the month that just ended.
Note: leave accrual is switched on per company. If you don’t see the “Accrual rules” tab below, message Trellis Support.
From the sidebar, click “Attendance” to expand the menu, then select “Leave Management”.
Open the “Accrual rules” tab and click “Add rule”.
Choose the Leave type the credits go to (paid leave types only).
Enter the Days per year. For 0.5 days a month, enter 6 (0.5 × 12). Trellis shows the Days per month it works out from this.
Optional settings:
Starts each year in — the first month the rule credits, every year. Leave it on January to credit all year. To start a rule now, just assign it.
Wait after hire (months) — how many months an employee works before credits start. 0 means from their first month.
Under More options, keep How days are added on Every month (recommended). Switch on Count back to the start of the year if credits should count from Jan 1 or each employee’s hire date (whichever is later) instead of from the day you assign the rule.
Click “Add rule”.
Open the “Allocation” tab.
Click “Assign Accrual Rule” — at the top for several employees, or on one employee’s card for just them.
Choose the rule, tick the employees, and click “Assign to … employees”.
A rule credits only the employees it is assigned to.
From January: with 6 leaves a year, everyone gets exactly 0.5 on the 1st of every month, so 6 by the end of the year.
Half and whole days only: Trellis adds credits in half days. With 10 leaves a year the credits go 0.5, 1, 1, 0.5, 1 … and still reach 10 by December.
Starting mid-year: credits are worked out from each employee’s own start date, so the first ones are smaller. For example, with 6 a year and Count back to the start of the year switched on, someone hired September 11 gets 0.5 on November 1, December 1 and January 1.
December’s credit is added on January 1, into the new year’s leave balance.
On the “Allocation” tab, each employee’s card shows Total Leaves, Accrued, Used and Remaining.
The Accrual history on the “Accrual rules” tab lists every credit, and says why anyone was skipped (for example, Waiting after hire or Not on a rule).
Employees see their own balance on their Leaves page.
Accrual runs by itself on the 1st of every month, so normally there is nothing to do. If a rule was assigned late, click “Run accrual” on the “Accrual rules” tab, pick the past month, click “Preview” to see who will be credited, then click “Add days for … employees”.
Read the full guide →From the sidebar, click "Home."
On the Dashboard, click "Requests."
On the Requests page, click the "Approvals" tab.
Find the leave and click its X button.
Type your reason, then click "Confirm Decline."
The employee is notified, with your reason.
If you opened the leave from your admin dashboard, click "Reject" on its card, add a reason if you like, then click "Confirm Rejection."
Read the full guide →No articles match your search.
Reach out to our support team and we'll guide you through it.
Contact Support